
from Stevens Creek Software
Go to the iTunes store to purchase a copy of this software
Latest released version: 2.2
PocketTimer XC from Stevens Creek Software is a compete race timing software solution designed for timing high school and college cross country races and posting results directly to the web. It features:
The software runs on an iPhone, iPod Touch, or iPad, but from here on in the manual we will simply say "iPhone" to refer to all three.
One note on conventions in this manual. A number of parameters used by the software are entered not in the software itself, but in the iPhone "Settings" app, in the TimerXC section. These parameters appear in this manual in bold italics. When you see something in bold italics, it's something that you must go to the Settings app to change.
The software consists of four main screens - Timer, Divisions, Teams, Runners, and Results, which are selected by the five "tabs" along the bottom of the screen:
![]()
You'll be interacting primarily with the Timer screen, but we'll start by looking at the Divisions, Teams, and Runners screens because those are the things you'll set up in advance of the race.
The Divisions screen displays a list of the divisions which you have created, like this:
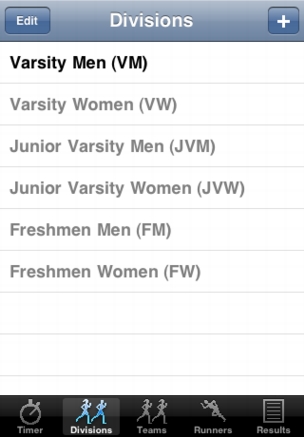
On this screen you see all the divisions you have created, including those who are not active in the current race you are timing. Active divisions are shown in black, while inactive divisions (which you have created but will be timing in other races) are shown in gray.
The Edit button in the upper left puts the screen into an edit mode, which allows you to delete divisions or reorder them. The + button takes you to the screen where you can enter new divisions:
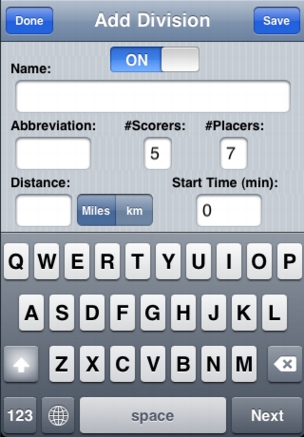
Information you enter about each division is as follows:
After entering all information, tap the Save button to save the new division (don't tap the Done button in the upper right until you are finished entering all the division).
To modify the information about a division, simply tap the name of the division to modify on the main Divisions screen, and the information for that division will appear, ready to modify. The most common reason to do this will simply be to activate or deactivate the division, but, because different cross-country courses often have different lengths, you may also need to modify the distance as well. Don't forget to tap Save when you have made a change, or the changes will not be saved.
The Teams screen displays a list of the teams which you have created, like this:
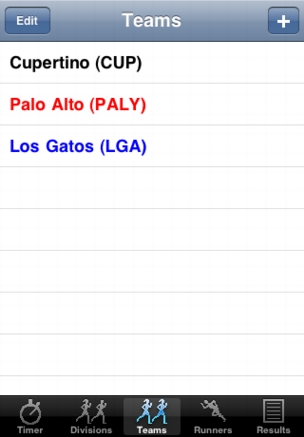
On this screen you see all the teams you have added. The colors are something you select, in order to help with quick visual identification of the finishers (on-screen, not in real life!). It's perfectly ok to leave teams in your list even if they aren't involved in the current race; only teams who actually have runners in the race (and finishing) will be scored.
The Edit button in the upper left puts the screen into an edit mode, which allows you to delete teams or reorder them.
The + button takes you to the screen where you can enter new teams:
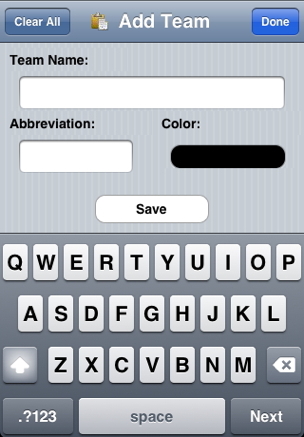
Information you enter about each team is as follows:
After entering all information, tap the Save button to save the new division (don't tap the Done button in the upper right until you are finished entering all the division).
To modify the information about a team, simply tap the name of the team to modify on the main Teams screen, and the information for that team will appear, ready to modify. There really is little reason to do this.
Entering teams in this way "by hand" is simple enough, but if you prefer, you can also download them from a simple text file which is on an external computer (a website or a local computer configured as a "web server), or which has been transferred into the iPhone via iTunes file sharing.
You configure the download in the iPhone Settings application, under TimerXC:
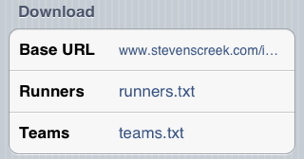
Base URL describes the website and folder in which the file containing the list of the teams are contained. For example, if your website is www.myrunningclub.org and you want to organize the results for a particular race in a folder named our5k, the Base URL might be www.myrunningclub.org/our5k. If you have a local wireless network, with a computer running a web server, you can instead download from a local URL. If Base URL is either local or iTunes, then the software looks for the file on the iPhone itself, where you have previously installed it using iTunes file sharing. Details of using iTunes file sharing, and of setting up a computer as a web server, are found in the Appendix, along with subtle details about file "encoding" (relevant if your team names have accented or non-Latin alphabet characters), and line endings.
Teams contains the name of the file containing the runners (teams.txt by convention but you can name it anything).
The format for this file is simply the team name, a tab, and then the abbreviation (you can't specify color using this method), one team per line, like this:
Cupertino->CUP
Palo Alto->PALY
Los Gatos->LGA
The "->" in the example above represents the Tab character.
To download the teams from a file, you must first clear any existing teams. Tap the Clear All button and, after confirmation, the teams will be cleared and the button will change to read Download (if there were no teams to begin with, the button will already read Download when you first enter this screen). Now tap Download to download the file. Once the teams are entered in this way, you can return to the main team screen, tap the Edit button, and set different colors for the different teams if you prefer.
You can also copy team information from the iPhone clipboard by tapping the Clipboard icon to the right of the Clear All or Download button. This will take information from the clipboard which you have copied from any other software on the iPhone, for example, an email or the Notes application. When you tell the software to paste team information from the clipboard, it will display the first part of what is on the clipboard on screen so you can check that you have what you think you have; when it does so, it will actually use the "->" characters in place of the tabs so you can more easily see that you have done things correctly (or not). See the section "Emailing Data to Your iPhone" at the end of the manual for tips about the best way to email information including tabs to your iPhone.
The Runners screen displays a list of the runners which you have entered, like this:
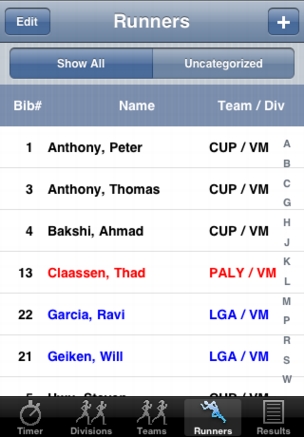
The list of runners can be displayed in a number of ways. In the image above, the names are displayed in alphabetical (by last name) order. In this mode, an alphabet down the right side of the screen, which contains only the letters corresponding to names actually in the list, can be used to quickly scroll to that section of the list. You can also display runners in Bib# order, or sorted by Team. To change the displayed order, tap on the column headings - Bib#, Name, or Team/Div - in order to sort according to that method. If you tap the already-selected Runners tab at the bottom of the screen, the list of runners will scroll to the bottom; tapping on any of the column headings (e.g., Name) will scroll back to the top.
At the top of the list you'll see two more choices. Show All displays all the runners. Uncategorized displays only those runners whose team name or division doesn't correspond to one of the entries in the list of teams or divisions you established on the other screens. Typically this will be due to an error or incomplete information about the entrant, and may be something you want to correct, which is why you can quickly find those people by tapping on the Uncategorized button.
The Edit button in the upper left puts the screen into an edit mode, which allows you to delete runners.
Entering Runners Manually
To add a new runner, tap the + button and you'll get to this screen:
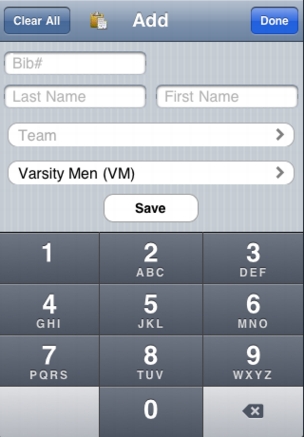
Information you enter about each runner is as follows:
When you are done entering information, tap Save (if you mistakenly tap Done, thinking you are Done, you will be reminded that you haven't actually saved the information yet). After you save one entrant, the name will be erased ready for a new entry. The Team and Division will be left as is, since you will typically be entering all the runners for one team and division in order, and the Bib# will be automatically incremented by one, since it is common for runners on the same team to have sequential numbers. Of course you can change any of this information before tapping Save for the next runner.
You can also modify information later. From the main Runners screen, just tap the name of the runner whose information you wish to modify. The screen above will appear, only this time with the existing information for that runner filled in. Make the necessary corrections, tap Save, and the runner's information will be updated. In that case you won't need to tap Done, because you'll be automatically returned to the main Runners screen.
As an alternative to pasting runner information from the clipboard (taken from, e.g., an email), you can also download it from a simple text file. The location of the file, whether on the Internet, on a local computer, or already on the iPhone, is specified by Base URL and Runners in the Settings app, with the same choices as described above in the Teams section.
The format for this data is the information from the screen above - bib#, last name, first name, team (using the case-sensitive abbreviation established above on the Teams screen), and division (using the case-sensitive abbreviation from the Divisions screen), all separated by Tabs, one runner per line, like this:
2->Pommier->Max->CUP->VM
6->Jain->Shubhankar->CUP->VM
15->Kelsey->Charlie->PALY->VM
23->Walker->Aaron->LGA->VM
25->Jorgenson->Jacob->LGA->VM
The "->" in the example above represents the Tab character.
Assuming you have already configured the information in Settings, to download the list within PocketTimer XC, tapping + from the main Runners screen to go to the Add Racer screen. If there are any runners on the list, you must first tap Clear All to clear the list. Now the button in the upper left will read Download (if there were no racers entered, it will already read Download); tap it to download the list of racers.
As described above in the Teams section, you can also import the runner information from the iPhone clipboard, having copied it there from some other iPhone application such as Notes or Mail. The process is as described above in the Teams section.
Once the divisions, teams, and runners are set up (and you can add to or correct these later if you realize there is a problem), you're ready for the meat of the program - timing and scoring a race. The timing screen looks like this:
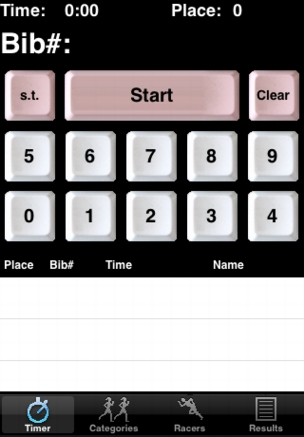
On the top are displayed the running time (0:00 in this image because we haven't started the timer yet), the current place, and, in much larger numbers, the Bib# of the racer you are about to record. Below that are the buttons used for recording. Start is used to start the timer; once it starts, the label on this button will change to Record and it will be used to record times as runners cross the finish line (or pass through a checkpoint; the software works at any time check point, obviously). The numeric buttons are used to enter the Bib# of the runner as they approach (if possible) or cross the finish line; as you enter them, the number will be displayed above, and, as we see in the example below, if that number corresponds to a runner in the list, the name of that runner will be displayed as well. This not only helps as a quality control (if a man's name appears and a women is approaching the finish line, you'll know something is wrong), but can also be used to announce the approaching runner to the crowd, if you choose.
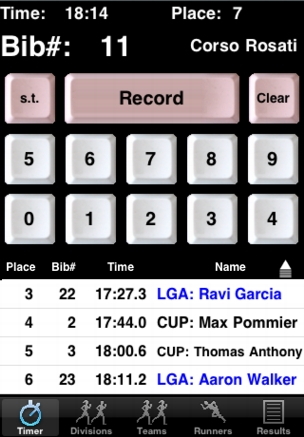
In this example, six runners have already crossed the finish line; their teams, names and other information are displayed in a scrolling list at the bottom. Runner #11 (Corso) is approaching the finish line, and we already know who he is; we can also see in the upper right that he'll be in 7th place when he finishes. When he crosses the line, we'll tap Record to capture his time.
s.t. stands for "Same Time" and is used when two racers cross the finish line in a tie. Since you can't enter two at once, enter one of the two racers' bib# and then tap Record as they cross the line. Now enter the second bib#, and tap s.t., which will record the time for the second runner using the previously recorded time. Clear erases any bib# you are entering to allow you to correct it (there is no backspace; Clear simply erases the number and lets you start over. In practice, since the numbers are usually only a few digits, that seems simpler anyway). Even though the finishers are not exactly tied for purposes of scoring (one runner is judged to be ahead of the other), you can still assign the same time to the second runner for recording purposes.
The list of finishers at the bottom (the most recent four are always shown, but the list scrolls to show all the finishers) serves a variety of purposes, but one of them is for making additions and corrections. Sometimes, a racer crosses the finish line without their number showing. Just tap Record to record the time. Now, when you have the opportunity (either once the race is over or when there is a gap in the runners approaching the finish line), tap that entry on the list at the bottom, and the Modify Entry screen will appear:
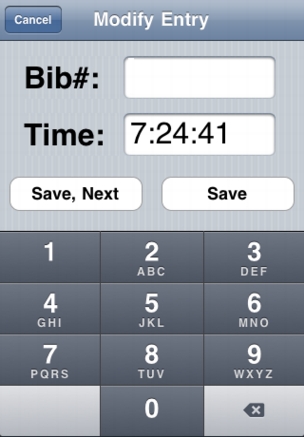
Enter (or correct) the Bib# as you wish, or, if relevant, change the time (perhaps you realize you were 5 seconds late on this finisher for some reason). When entering times, ignore the colons, just enter a number, e.g, "72441"; the colons will be filled in later by the software. Tap Save and the correction will be made. You can also use this technique if you completely missed a finisher and are entering them "post-facto", perhaps from a written list that someone else was compiling. Just tap Record on the main screen to record whatever time it reads, then tap the entry and use the Modify Entry screen to enter the desired Bib# and Time.
There are a few things about the main Timer screen which aren't obvious on first glance. First is the ability to offset the time. Perhaps somehow the time displayed on screen doesn't match the "official" time. Put your finger down on the main Timer screen in the upper left on the word Time and hold it there for three seconds or more, then let go. You will be asked if you want to offset the time. If you answer "Yes," the Offset Times screen will appear:
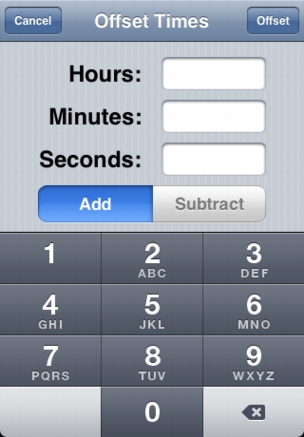
You can enter in a value of hours, minutes, and/or seconds that you want to add to or subtract from the displayed time. So if you notice a 5-second discrepancy between the iPhone time and the "official" time, you would enter "5" in the Seconds field and make sure the selector reads Add or Subtract as appropriate, and then tap Offset in the upper-right. When you do that, if you have recorded any times already, they will also have five seconds added to or subtracted from the recorded values, reflecting the new, correct starting time.
As you record times, the display on the bottom of the Timer screen always scrolls to show you the more recent four times recorded. You can of course scroll in the "normal iPhone way" using a flick of the finger. You can also scroll to the top of the list by tapping just above the recorded times on the word Place (not the "Place" in the upper-right), and you can scroll to the bottom by tapping on the already selected Timer tab at the very bottom of the screen.
If you need to review more than four times, an alternative to scrolling is to use the "pull up" icon at the very right, just above the list of times and names. Tapping this button will expand the list of times and names to occupy the full screen, and the "pull up" icon will be replaced with a "pull down" icon, which you can tap to revert to the normal display. When the list of times and names occupies the full screen, you cannot record any new times, so you should only do this either if the race is finished or if there is a sufficient gap in the runners approaching the finish line.
When you start the timing, a message will pop up telling you how to stop the timer, which is accomplished by pressing your finger down on the Record button (a time will be recorded when you do so; don't worry about it) and holding it down for three or more seconds. When you let your finger up, you'll be asked to confirm that you really want to stop the timer. Assuming you answer "Yes," the timer will stop.
To erase the recorded times, you press your finger down on the Clear button and hold it down for three or more seconds. When you let your finger up, you'll be asked to confirm that you really want to erase the recorded times.
To erase one recorded time, presumably a time you recorded erroneously, just swipe your finger to the right across the entry (on the bottom of the screen). A Delete button will appear on the right end of the line. Tap it to delete the entry, or swipe your finger left (or just tap elsewhere) to change your mind.
It is possible to recall previously recorded times that you have uploaded to a file. Perhaps you want to re-score a race you had previously scored, but need to make a correction or something. To do this, you must first clear any existing times as described in the previous paragraph. Now, press your finger down on the word Time above the table on the bottom (not the word "Time" in the upper-left of the screen) and hold it down for three or more seconds. When you let your finger up, you'll be asked to confirm that you want to download times. If you do, the software will use the same "base URL" that it used to download runners (described earlier), adding to it the file name for the times, also from the Settings application (times.txt by default, but you can of course change the name). The format of that file is again a simple text file, one entry per line, with a bib# or a "?" if the bib# is unknown, a tab, and the time in the "colon" format (e.g., 2:23:15).
The Results screen can display results by team, or by individual finisher, depending on the selection at the top of the screen:
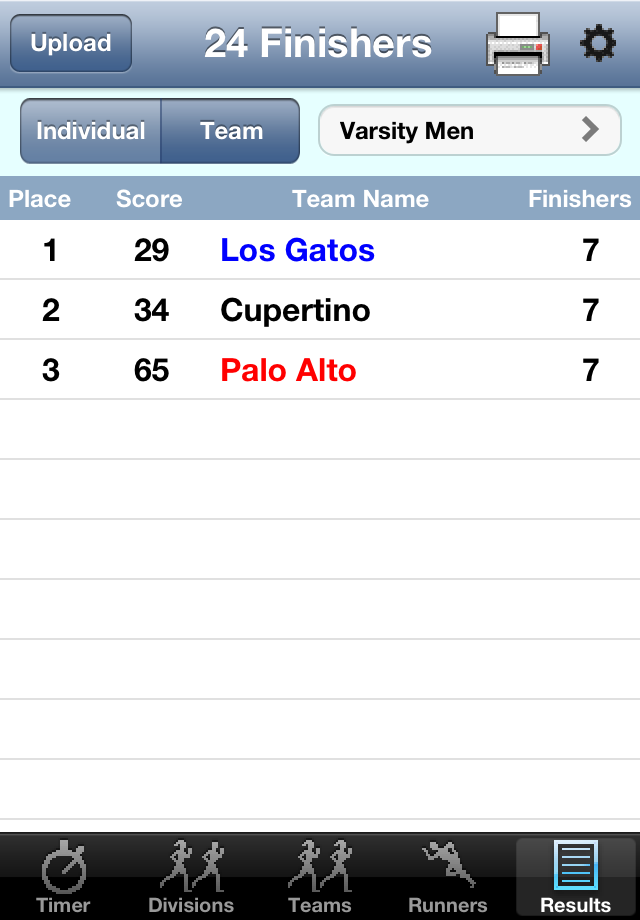
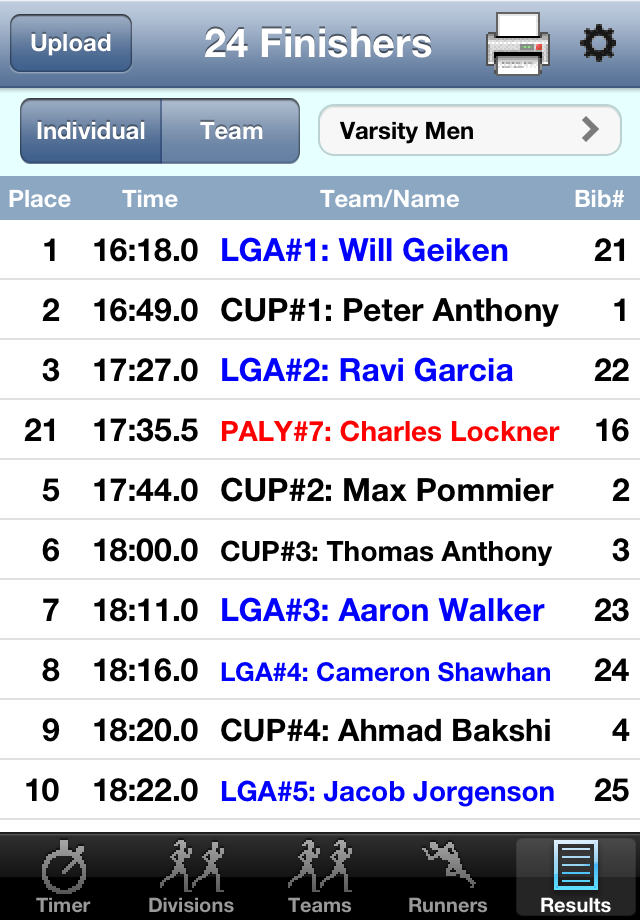
Results are automatically calculated when you switch to the Results screen, so you can do so at any time during the recording of the finishing times - the displayed results will always be up-to-date. Team results won't be meaningful until the required number of scorers have finished for that team, although they are displayed (in an appropriate order), along with the number of finishers.
In Overall mode only, tapping on the word Place on the table header will scroll to the top. Tapping on the already-selected Results tab will scroll to the bottom of the list.
The one perhaps non-self-explanatory element of the results display occurs when a team has more actual finishers in a division than the number of "allowed finishers" specified for that particular division. Such runners will appear on the Results screen, in the proper order, but under "Place" you'll see a dash (-) indicating that their place is ignored for purposes of scoring.
At any time during or after the race, you can upload the results directly to the web (assuming you have a phone or Wi-Fi connection to the web!). Some key parameters for doing so are found by tapping gear (Settings) icon on the upper right of the Results screen.
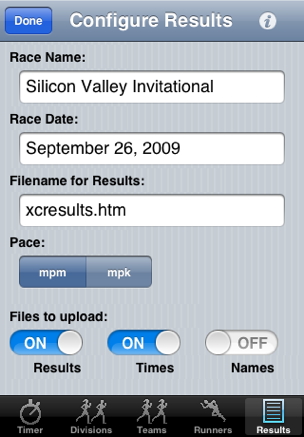
The Race Name can contain anything you want. Tapping on Race Date will display a "date picker" allowing you to select the date. These two pieces of information will be used in the header of the web page that is created. Filename for Resultsis self-explanatory. If you are uploading results to a website, then this is added to the Base URL to produce the complete URL by which the data will be accessed. This filename is accessible both here and in the Settings app as described just below, but other values which you will need to enter before actually uploading any data, values which you will change less often if at all, are accessible only in the Settings app.
Set the Pace in minutes per mile (mpm) or minutes per kilometer (mpk) (pace is not displayed on the iPhone itself, only on the uploaded results).
Which files are uploaded (output) is determined by the three switches at the bottom.
Uploading files also requires some configuration in the iPhone Settings application.

Email/Base URL can be either an email address or a URL for the website or computer to which you want to upload the results. If it is an email address (which the software can tell if there is a "@" in the name), the output file or files will be emailed to this address. If your iPhone is configured to send email (the Mail app has one or more active accounts), then the files will be emailed via the native Mail app, and will either be sent immediately or queued for sending later (depending on whether you have an Internet connection or not). If your iPhone is not configured to send email, the software will send email via Stevens Creek Software servers. In this case, the attempt to send email will fail if you do not have an Internet connection. If the email is sent via the Stevens Creek Software servers, it will arrive with a "sender" of pockettimer@stevenscreek.com, and you'll need to make sure that your email software will accept email from that address, either by putting it on a "white list" or by making sure it is not on a "black list."
Email/Base URL can also have the special values local or iTunes (which produce the same result; use whichever you like). In this case, when you output the file or files, they are transferred to a special place on the iPhone from where they can be accessed via iTunes when the iPhone is connected to your computer.
If Email/Base URL is an actual URL (e.g., something like www.myschool.edu/raceresults), you must enter a User Name and a Password; otherwise, User Name and Password can be left blank. Note that this URL is very frequently not the same URL that someone will use to access the file on the web; a folder accessed as www.stevenscreek.com/raceresults via a web browser might have a URL of ftp.stevenscreek.com/www/htdocs/raceresults for ftp upload. Exactly what it is requires knowledge of the precise configuration of your web server
Further details on all this can be found in the Appendix.
Once you have the upload settings configured, you can initiate the upload at any time by tapping the Upload button on the upper-left of the Results screen. All uploading is done "in the background," so you can immediately get back to recording finishers if you initiate an upload while the race is in progress. The software won't let you start another upload until the first one is finished, and when an upload finishes, you'll hear a "whoosh" sound to let you know it's done (or a "ding" if using iTunes file sharing).
Beginning with version 2.2 of PocketTimer XC, and if you are running iOS 4.2 or higher, results can be printed. Tapping the printer icon will print either the team results or the individual results, depending on which set of results are currently displayed on the Results screen. Information on AirPrint and how it works is available from Apple here, but suffice it to say that if you have an AirPrint-compatible printer on the same network as the iPhone, it is simplicity itself.
There are several possible complications involved with printing, especially with printing in the field. The obvious one is power for the printer. There are portable battery-operated printers on the market, although not very many. If you don't have one of those, there are two ways you can power a printer inexpensively. One is with a $20 (or so) inverter, which plugs into your car cigarette lighter. You'll only need a low-power (e.g., 100W) unit to power a printer. For a little more, you can buy a 90W rechargeable unit which will have all the power you need, and won't be dependent on a car (caveat: we ourselves only have experience with battery-powered printers, and have no experience with these portable inverters).
A second portential complication is that you don't have an AirPrint-compatible printer. If you have a Macintosh computer, the solution to this is available for $19.95 – a software program called Printopia. You install this program on your computer, and now when you print from the iPhone, the iPhone software will see any printers attached (wired or wireless) to the computer. Similar software appears to be available (for free!) for Windows, but we have no experience with this software. Printopia has two related features which don't appear to be available on the Windows software (at least on the Windows software we know of). Instead of printing, you can simply "print" to a PDF file which appears on your Mac (in a folder you designate), and which automatically opens on the screen of the Mac (which would, for example, allow those already finished to read it on your screen). Alternatively, if you have a Dropbox account, you can transfer the file to Dropbox.
A third complication if you are working in the field is establishing a wireless network to connect your iPhone and computer, and hence your printer (if you're back in your home or office where there is an established wireless network, there's no problem). In the field, you select Create Network in the Airport menu (on the top line of your Mac screen). Now on your iPhone connect to that network. We have seen situations where this connection won't "stick." If this happens, put your iPhone in "Airplane Mode" (which automatically turns WiFi off) and then turn WiFi back on and connect again to the newly-created network. We have no experience with creating such a local wireless network under Windows; it may (or may not) be possible.
Some obvious things:
Some less obvious things:
Files of information containing team names and lists of runners can be emailed to your iPhone and then copied and pasted into PocketTimer XC, as noted above in the Teams and Runners chapters. However there are some things you need to know.
The iPhone has a standard Mail application that can receive mail, and you can also use Safari to access various webmail sites such as Hotmail, Yahoo, etc. There are two complications when using email to send information from your desktop to the iPhone to be used within PocketTimer XC. First, many email applications convert tabs into spaces. This can be a problem at either end, that is, either the sending email software you are using, or the software you are using to receive email on the iPhone. Second, some email programs will "line-wrap" lines after, say, 72 characters. This isn't likely to be a major problem, unless your teams or runners have very long names!
PocketTimer XCdeals with the tab problem as best it can. It is programmed to recognize the common ways in which different software replaces the tab character, and it can reconstruct the proper tabs in most situations. However, in order to allow you to verify this is being done properly, when you go to paste data into your log, the software will show you the first 2000 characters of what is on the clipboard, and ask you if it "looks ok" before it proceeds to use that data. In doing so, it shows tabs as "->", so you'll be able to judge if it has recognized the tabs properly.
In general, both the tab and the line-wrap problem are best dealt with by emailing the information as an attachment to the iPhone. At the moment this only seems to work with the Mail application; using Safari to view Hotmail (and possibly other webmail) doesn't allow you to view attachments. The Mail application has its own minor problem, which is that the file must have a ".txt" ending in order to be opened as a simple text file, but that's easily dealt with. If you don't have Mail set up to receive on your iPhone, but do use Safari to view, e.g., Hotmail, send the log from Hotmail as well, in the body of the email; that seems to work.
Once you have the email in question, in the Mail app, you hold your finger down on the text, tap on Select All when it appears, and then Copy, then go to PocketTimer XC, go to the appropriate screen (as described above in the relevant sections of the manual) and tap the Clipboard (paste) icon. Safari seems to be implemented differently, in that Select All does not appear when you hold your finger down on the text. Instead, just one word is selected, and the word Copy appears. You then have to drag the left selection bar to the "top" of the file, and, sometimes, a "right" selection dot to the right, which seems to then select all the way to the bottom. This may seem confusing, but once you've figured it out, it should become routine.
There are some files set up on the Stevens Creek Software website which you can use to try out the software. To use these files, follow these steps:
Visit the Stevens Creek Software Home Page
Visit the Stevens Creek Software iPhone Software Support Page
© 2009-2011 Stevens Creek Software