
Latest released version: 7.2
Go to the iTunes store to purchase a copy of the software
Birdwatcher's Diary™ from Stevens Creek Software is the perfect birdwatcher's field companion. In seconds, you can make a note of birds you see or hear, including time and exact location (both automatically recorded), and additional field notes if you wish. Later, you can review the sightings, save them on your iPhone, iPod Touch, or iPad for later reference, and upload the recorded information to desktop software or online databases like eBird. Birdwatcher's Diary™ is designed to be useful for your "big day" efforts, Christmas Bird Counts, and for your everyday birding outings alike. This manual will introduce you to the features of the software, which include:
When you use the software for the first time, you are asked to register the software with us. Doing so entitles you to technical support on the software, and will help us keep you posted about updates to the software, and also provide an opportunity for you to suggest future enhancements of the software. We hope you will take the time to do that so we can best support you (we get no information about our customers from Apple, so if you don't register, we have no way of knowing who you are). If you don't do so the first time you run the software, you can always register later by tapping the "i" (information) icon on the upper-right of the Input/Output screen.
Some aspects of Birdwatcher's Diary, ones you aren't likely to need to change very often, are configured in the iPhone (or iPod Touch or iPad; from this point on in the manual, we'll refer only to "iPhone," but we mean all three) Settings application, which is accessed from this icon on the Home screen of your iPhone: ![]() . We'll discuss each of these settings in the course of this manual. When you see the name of a parameter in this manual shown in Bold Italics, you'll know it's a parameter that you set with the Settings application.
. We'll discuss each of these settings in the course of this manual. When you see the name of a parameter in this manual shown in Bold Italics, you'll know it's a parameter that you set with the Settings application.
Birdwatcher's Diary is designed first and foremost to record sightings during a day's birding. To do this, there are four concepts to understand:
The master list or checklist is the list of all the possible birds you might see. The software preconfigures itself with either a complete United States list (for most users), or a UK or Mexico list if the software detects you are in either of those two countries. We'll learn later how you can install any list you want, from a complete world list containing 10,000 or more species to your county list containing just a couple hundred species. List for all 50 states and dozens of different countries are available for download, or, as you'll again learn later, you can make your own as well. For now we'll assume you will start with the pre-installed list, but fairly quickly you'll want to download either your state list (if you're in the U.S.) or your country list.
A location is a named place that you bird, and for which you will be recording sightings with the software. It could be as specific as "My Yard", the name of a local park or other birding spot like "Rancho San Antonio Open Space Preserve" or "Charleston Slough", or a much broader location like the name of a county, a state, or even a country. It's really up to you how specific you want to be in identifying the location of sightings.
The third concept is your list of sightings. In typical usage, you will start each day with a clean slate, a checklist with nothing checked. You'll select the location and then start ticking off species. You can tick each species once, if that's all you are interested in, or you can use the software to count the number of birds of each species seen. If you change locations during the day, just select the new location and keep going. If you're counting, of course you'll continue counting at the new location. If you're "just ticking," you have the option of ticking the species you've already seen at previous locations, which will give you a complete list for each location, or you can just tick the new species that you see — it's up to you.
At the end of the day (or at any intermediate time, if you like to be cautious), you'll take advantage of the fourth basic concept of the software — archiving. Archiving means saving a file of information just as you would on a desktop, but in the iPhone instead. Archiving makes your list of sightings permanent, so that you can clear the list to start anew the next time you go birding. If you want to do something else with the list of sightings — upload it to eBird, email it to your local bird list, import it into a desktop database, or just print it out — you can do that as well. A key concept to understand is that archives in Birdwatcher's Diary are designed as daily archives, that is you store all the sightings for one day, no matter how many different locations you visited or even if you went out in the morning and then again in the afternoon, in a single archive. If you go on a multi-day birding trip, each day of the trip has its sightings archived separately. However when you want to review your sightings, you can easily combine more than one archive, so that you can review all your sightings for the trip (or for the year or for your state or a variety of other criteria).
We started this section by saying that the software was designed first and foremost to record new sightings. Of course you can record old sightings as well, but we'll discuss that later.
One word before we start regarding eBird, the site maintained by the Cornell Lab of Ornithology which allows birders to submit lists of sightings to their online database. You'll find various mentions of eBird throughout this manual, but there are certain aspects of the software which need to be elaborated in more detail for eBird users. You'll find all those covered at length in a special section near the end of the manual. If you're an "eBirder," be sure to read that section before using the software.
This manual explains all the features of the software in complete detail. If you want to get started quickly, just to get a feel for things, here's a quick step-by-step guide to getting started:
That's all you need to do to use the software, but the software has lots of powerful features, and lots of options. Now it's time to learn all the details about how the software works.
The main screen that you see when you open the software, looks like this (after having recorded a few sightings):
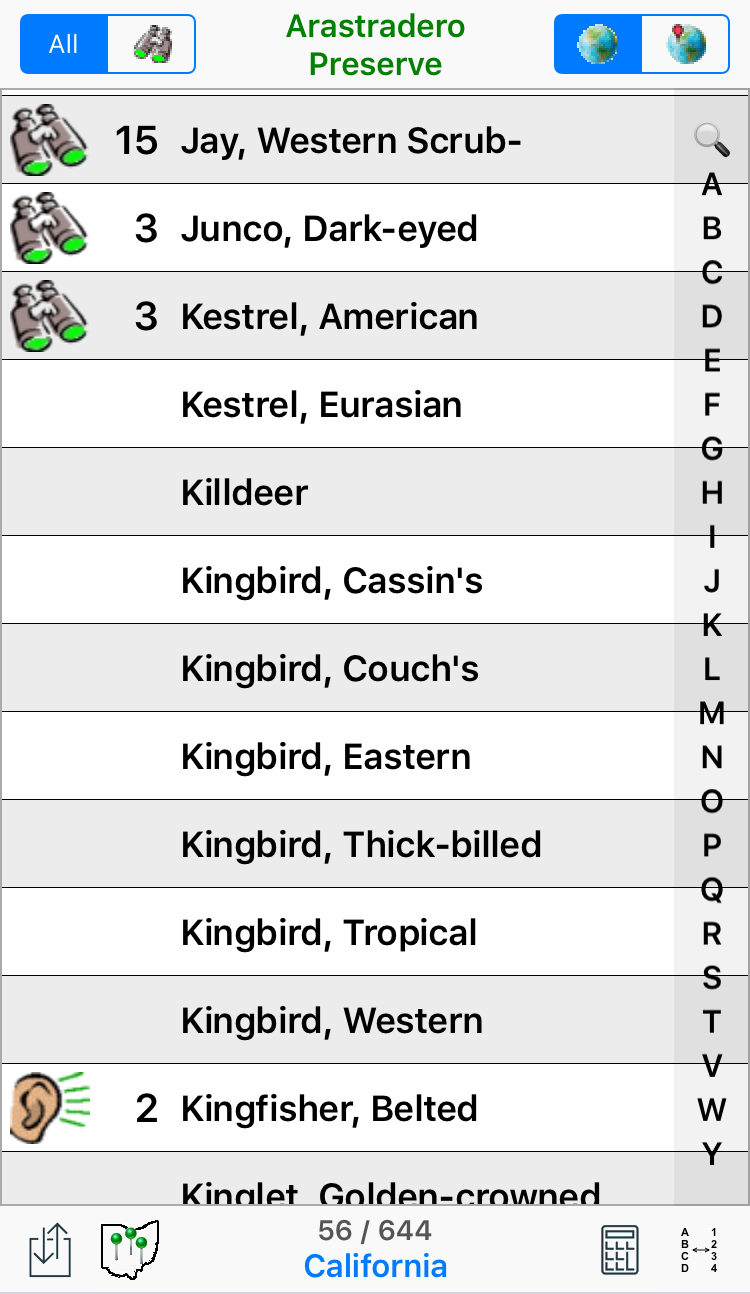
The central part of the screen displays a scrolling view of the species in your list. A binoculars icon at the left end of the entry indicates you have seen the species on this trip. An ear shows you heard the species, and, obviously, no icon at all is a species you have not seen or heard.
To "tick" a species, just tap on its name. If you are counting birds, repeated ticks will increment the count, one for each tap (in a minute we'll discuss how to increment the count by a large number). On your first tap, the software assumes you have seen the species and displays the "seen" icon (the binoculars) next to it. If you actually only heard the bird, you have one second to tap on the binoculars which appear (not on the name of the species) to change it to the "heard" icon (the ear). If you tap on the binoculars after a second, or at any other time, you'll get to the Edit Sighting screen, where you can change the species to "heard only" or, if it was "heard only" but now you've seen it, to change it back to a "seen" species.
The numbers show the count of each species. On some birding trips ("Big Day" birdathons, for example), numbers may not be of interest. To turn off the display of the numbers (and make a little more room for the names of the birds), set Show Quantity to Off (remember, the fact that Show Quantity is in Bold Italics means that you do so in the iPhone Settings app). On other occasions, like Christmas Bird Counts, the quantities are essential, so you'll want Show Quantity set to On in those cases. Whether you count birds or just tick them off is entirely up to you.
If you bird at more than one location on the same day, and record a species at more than one location, or if you record multiple sightings of the same species at the same location (described later in the Sightings Screen section of the manual), you may see a second number, superimposed on the binoculars or ear icon. Thus number indicates the number of different sightings of the species that you have recorded, while the "main" number shows the count of birds of that species, like this:
![]()
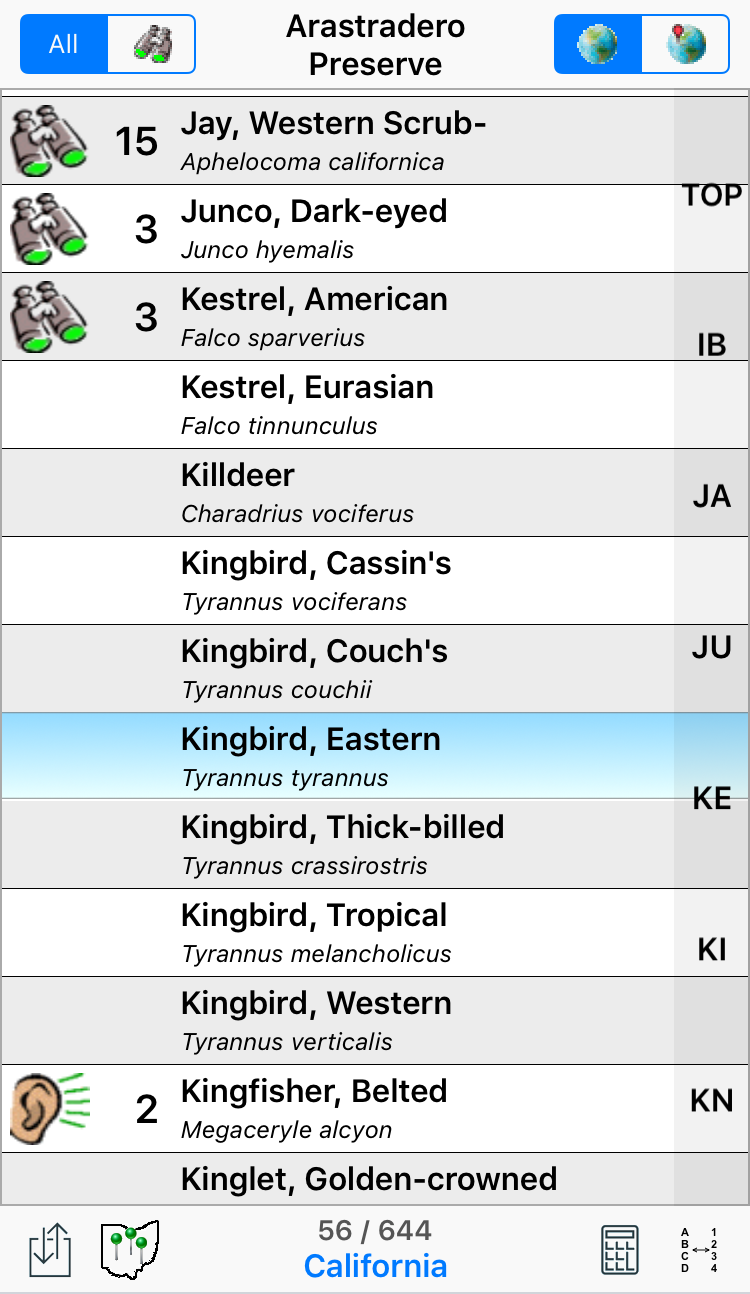
Another configuration option, Display, determines what is displayed in each row. The screen above shows just the Name of the species, which is one option. A second option is to display the Name and Scientific Name of the species in each row, as shown here:
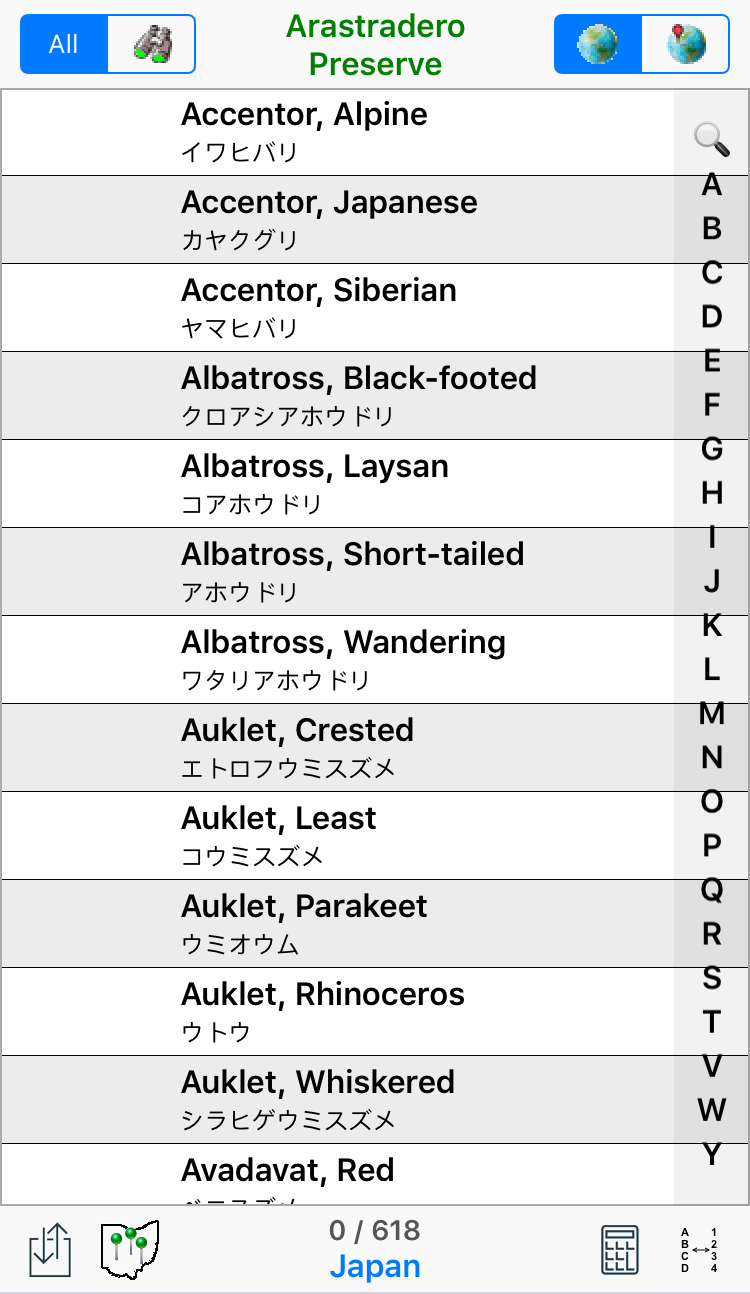
There are a variety of other options. Some let you display the "local name" of the species, either on the first line or the second line, and together with the English name or Scientific name. The "local name" might be the name in Spanish or Chinese or German, or it might be in English but appropriate to different countries (for example, in the U.K., Loons are called "Divers"). Displaying local names will be of obvious interest if you are a native speaker of that language, but might also prove useful when you travel so you can better communicate with your local guide. Here's what a list of the birds of Japan looks like when you set Display to Name, Local Name:
One more option (not shown), setting Display to show the Time and Location of the first sighting of the species on the second line, is a popular choice, because it helps to provide a visual double-check on your records.
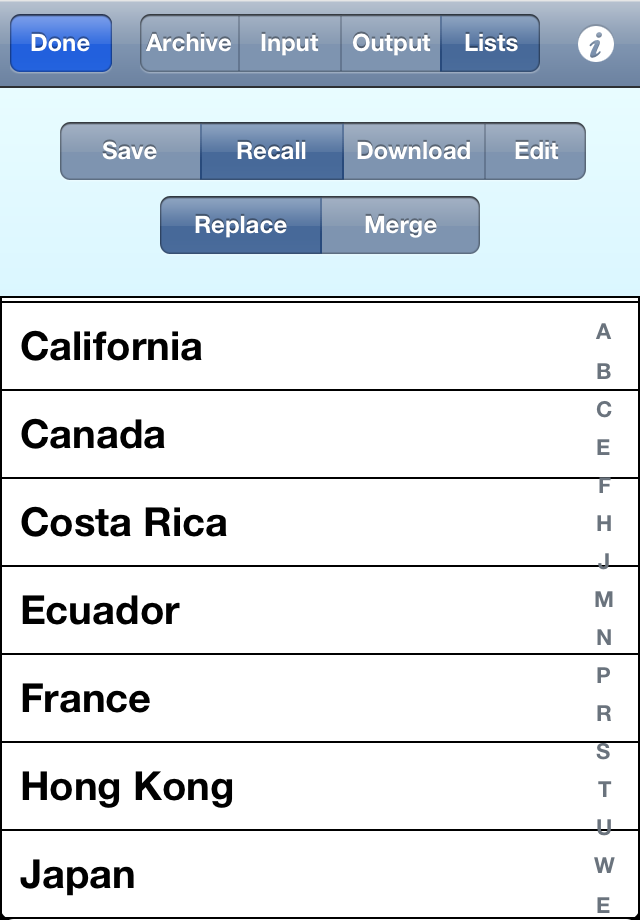
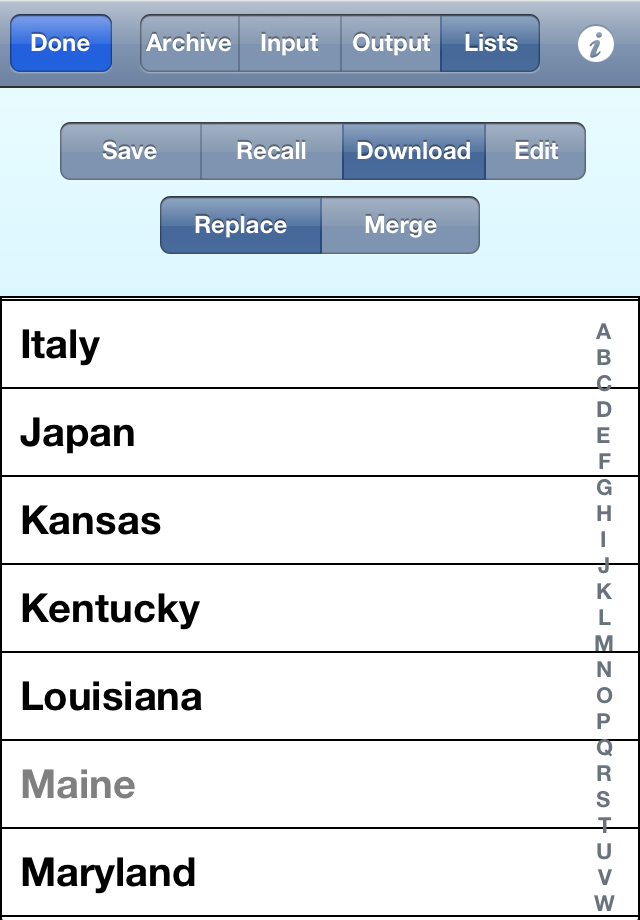
Down the right-hand side of the list is a standard iPhone feature, something we named "Intelliscroll™" when we began using it years ago in our PalmOS software. If you look at the first screen above, you'll see the letters go from A to Y (no Z because there aren't any birds on this list beginning with "Z"). That's the typical way you'll see things on the iPhone, for example, in the Contacts app. But Birdwatcher's Diary goes one step further with Enhanced Intelliscroll™, shown in the second picture. Here, we see what happens when we actually tap on the "J" in the first version. Instead of continuing to display the full A-Z (or A-Y) set of letters, Enhanced Intelliscroll expands the list to include two-letter combinations not only of the letter you tapped ("J"), but also the letter before ("I") and the letter after as well ("K"). The purpose of this is two-fold. First, when you have the full A-Z display, it's common to "miss" and actually tap a letter one above or one below the one you really wanted. Enhanced Intelliscroll allows you to quickly recover from that "mistake" by simply tapping the letter you really wanted. And second, when you have a list of 644 items (here, the birds of California), tapping one letter still leaves you with as many as 50-60 birds, of which you're really only looking for one. Rather than scrolling through seven or eight screens to find the bird you want, tapping a two-letter (and then, if appropriate, a three-letter) combination will get you that much closer. Once you are in two-letter mode, you can tap "TOP" to return to the top of the list or, more simply, tap the "status bar" (where the time and battery status appear) on the very top of the screen. The latter is a general iPhone technique for scrolling to the top of a displayed list.
The top line of the screen looks like this:
![]()
On the left are two grouped icons which determine what we display on the screen below. All shows us the complete list of species, the "green-eyed binoculars" show only the species you've ticked off. If you have already selected the "green-eyed binoculars," you can tap the same button again and you'll see "red-eyed binoculars," which show the species you haven't seen or heard. This is particularly useful for "big-day" efforts towards the end of the day, when you want to review the birds you still "need."
Switching to "seen-only" (green-eyed binoculars) is tremendously useful during Christmas Bird Counts, because after an hour or two of birding, chances are you're seeing mostly the same species over and over, and are just incrementing their counts. So tapping the green binoculars will now produce a list of perhaps 20 or 30 species rather than hundreds, and you'll be able to find and tick the new sightings that much faster. And of course you can switch back to "All" mode with a simple tap, should a new species show up.
In the middle of this line is the most important item, a button showing the current location ("Arastradero Preserve" in this example). Tapping on the button brings us to the Location screen, and allows to select the relevant location, or add a new one. This is an essential part of the operation of the software. Every time you move to a new location (that is, a new "named" location, not just a new position within the same park or preserve), you need to tap this button and change the location, so that sightings are properly recorded as belonging to that location.
On the right-hand side of the top line are two planet icons, one plain, and one with a red "pin." When the first is highlighted, the list displays your sightings at all the locations you've visited on this day. Highlighting the second shows only the sightings at the current location, so when you move to a new location during a day's birding, selecting this option is like "starting over," except that your sightings from the previous locations are really still there. At any time, you can switch back to the plain planet ("all locations" mode) to review your total sightings for the day, then back to the red pin ("this location only" mode) to see just your sightings at the current location.
The bottom line of the screen looks like this:
![]()
In the center of the bottom of the screen are two numbers. The first (56 in this example) represents the number of species recorded (or, if the "red-eyed binoculars" are highlighted, not recorded) on this trip at all the different locations you've visited if you are in "all locations" mode, or the number of species at just the current location if you are in "this location only" mode, while the second (644 in this example) represents the total number of species on the particular list you have chosen. The name of the list is shown below that. In this case, it is the California state list. If you merge two lists (also discussed later), the name will show "Composite List" to indicate that fact.
The "Input/Output" icon on the left![]() takes us to the Input/Output screen, where we can save (archive) our day's sightings, access our previously saved sightings, read in master lists of species, upload our sightings to eBird, and lots more (more on this later).
takes us to the Input/Output screen, where we can save (archive) our day's sightings, access our previously saved sightings, read in master lists of species, upload our sightings to eBird, and lots more (more on this later).
The "Sighting Map" icon ![]() displays a map of the active sightings (the ones represented on the main screen), with a pin representing each sighting (green for species for seen, red for "heard-only" species) and a birdhouse icon representing the different locations at which you birded:
displays a map of the active sightings (the ones represented on the main screen), with a pin representing each sighting (green for species for seen, red for "heard-only" species) and a birdhouse icon representing the different locations at which you birded:
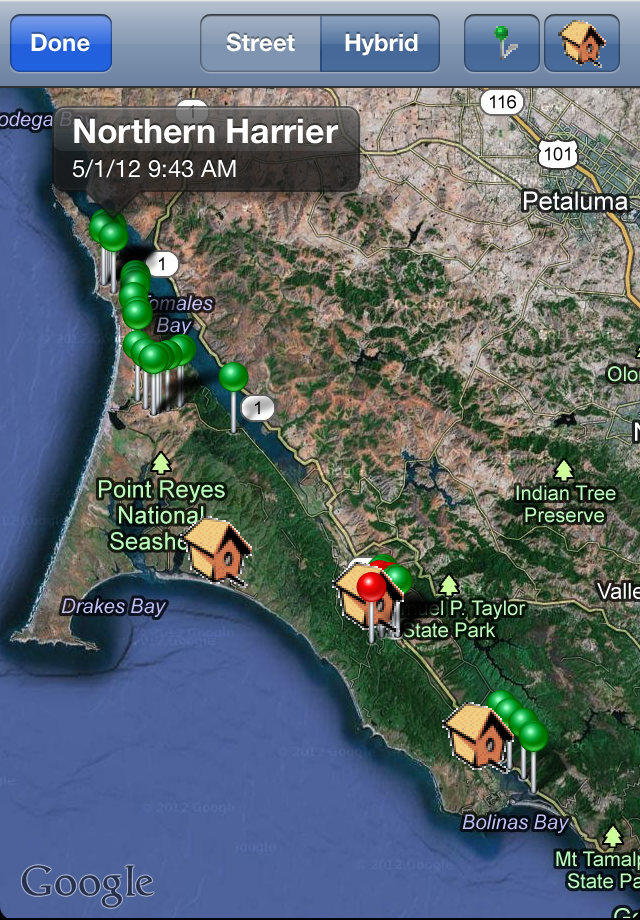
Tapping on any pin shows the name of the species seen at that location. You can turn off the pins (leaving only the birdhouses) or the birdhouses (leaving only the pins) using the two buttons on the upper right, and switch the map between Street and Hybrid views. You can expand the map by double-tapping on it or spreading or pinching two fingers, and you can scroll in the usual way, to zoom in on particular groups of sightings.
Birdwatcher's Diary doesn't allow you to save one of these screen maps. However, you can do a "screen capture" of any screen on an iPhone by holding down the power button on the upper-right (top) of the unit, and then pressing and releasing the round "Home" button on the bottom front of the unit. A picture of the screen is then put into your photo library, just as if you had snapped it with the camera. When we get to the Output section of this manual below you'll learn how you can export information to Google Maps and Google Earth to view full-size, interactive maps you can view on your desktop.
The Sort icon: ![]() gives you a choice of five options for sorting the list of birds: First Name, Last Name, Scientific Name, Code, Taxonomic Order and Time. The list in the screen shots above is ordered by Last Name. This ordering has its pros and cons. For scrolling, as we have just been discussing, a lot of birds start with "SW" (all the Swallows) or "WA" (all the warblers), or many other two- and even three-letter combinations. So even with the three-letter Enhanced Intelliscroll, you still may have to scroll through a few screens to find the bird you want. That's the con. The pro is that you don't have to remember that a "Dipper" is really an "American Dipper" or that a "Starling" is really a "European Starling"; you just have to think of the common one-word name of the bird in order to find it. If you're a bit more of an expert, though, you won't have any trouble thinking "American Dipper" or "European Starling," and in that case, you might want to simply sort by First Name. There are many birds with the same first name as well, of course ("American" this or "Black" that or "Lesser" something else), but the duplications aren't nearly as many as when sorted by Last Name. Use whatever works for you. Similar to First Name sorting, but not identical, is sorting by (typically 4-letter) bird banding Code. If you find that mode preferable, it's there to use, as is sorting by Scientific Name. Strictly speaking, 4-letter bird banding codes are only defined for U.S. species, and there, the resolution of "collisions" (where the rules for choosing the four letters produce the same four letters for two different species) is again defined. In this software we use "pseudo-bird-banding codes" so that we can extend the concept to the worldwide list of 15,000+ species. We use the same rules, but, other than for U.S. species where the "collisions" are resolved, we simply assign the same code to two or even more species. Since this code is only being used to quickly scroll to the species of interest, the fact that two or more species have the same code is not a problem.
gives you a choice of five options for sorting the list of birds: First Name, Last Name, Scientific Name, Code, Taxonomic Order and Time. The list in the screen shots above is ordered by Last Name. This ordering has its pros and cons. For scrolling, as we have just been discussing, a lot of birds start with "SW" (all the Swallows) or "WA" (all the warblers), or many other two- and even three-letter combinations. So even with the three-letter Enhanced Intelliscroll, you still may have to scroll through a few screens to find the bird you want. That's the con. The pro is that you don't have to remember that a "Dipper" is really an "American Dipper" or that a "Starling" is really a "European Starling"; you just have to think of the common one-word name of the bird in order to find it. If you're a bit more of an expert, though, you won't have any trouble thinking "American Dipper" or "European Starling," and in that case, you might want to simply sort by First Name. There are many birds with the same first name as well, of course ("American" this or "Black" that or "Lesser" something else), but the duplications aren't nearly as many as when sorted by Last Name. Use whatever works for you. Similar to First Name sorting, but not identical, is sorting by (typically 4-letter) bird banding Code. If you find that mode preferable, it's there to use, as is sorting by Scientific Name. Strictly speaking, 4-letter bird banding codes are only defined for U.S. species, and there, the resolution of "collisions" (where the rules for choosing the four letters produce the same four letters for two different species) is again defined. In this software we use "pseudo-bird-banding codes" so that we can extend the concept to the worldwide list of 15,000+ species. We use the same rules, but, other than for U.S. species where the "collisions" are resolved, we simply assign the same code to two or even more species. Since this code is only being used to quickly scroll to the species of interest, the fact that two or more species have the same code is not a problem.
If you do choose Last Name sorting, as most people do, there is one more subtlety. If you look in the index of some bird books, you'll find, e.g., Black-crowned Night-Heron listed under "N" and Western Scrub-Jay listed under "S"; in others, you'll find them listed under "H" and "J" respectively. Birdwatcher's Diary provides you with both options, using the Sort "–" as " " setting. If On, the software acts as if the dash is a space and changes "Scrub-Jay" to two words and sorts the species as "J'; if Off, "Scrub-Jay" is treated as one word and is sorted as "S".
The other two sorting options are really not optimal for ticking birds, but become appropriate when you want to review or output a list of the birds you've seen. Taxonomic Order sorts species according to the Clements Checklist, enhanced with "pseudo-species" like "Gull sp." or "Short-billed/Long-billed Dowitcher". Such items do not have an "official" taxonomy since they aren't species, and their placement is somewhat arbitrary (does "Gull sp." come at the beginning of the Gulls or at the end?), and when available we follow the ordering established by eBird. Time shows the birds in the order you've ticked them (with unticked birds at the bottom). This is useful if someone in your group has been keeping a written list of birds, and you want to compare your electronic list with their written list. You can quickly switch back and forth between the sorting methods.
The final icon on the right end of the bottom line is the Calculator icon: ![]() . When you are doing a Christmas Bird Count and a flock of 45 Cedar Waxwings flies overhead, you aren't going to tap the screen 45 times! Instead, you tap the species first to select it and increment its count by one (or simply hold your finger down briefly on the species name to select it without incrementing the count), and then tap the Calculator icon and you'll see this:
. When you are doing a Christmas Bird Count and a flock of 45 Cedar Waxwings flies overhead, you aren't going to tap the screen 45 times! Instead, you tap the species first to select it and increment its count by one (or simply hold your finger down briefly on the species name to select it without incrementing the count), and then tap the Calculator icon and you'll see this:
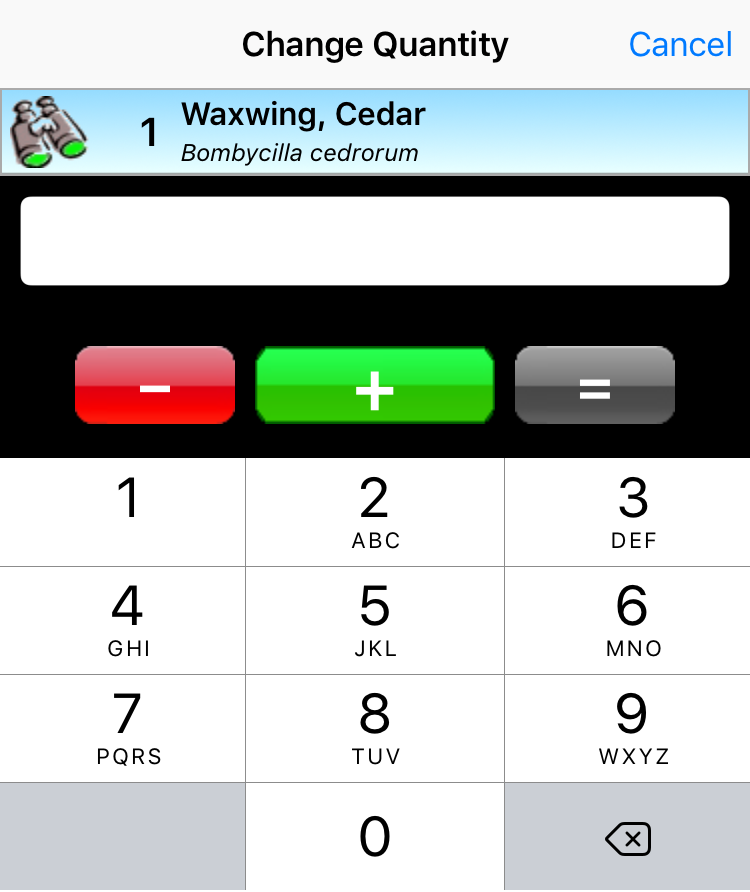
Now you use the screen like a typical calculator. Tap 4 then 4 then + and 44 will be added to the current count for that bird (44, not 45, because when you tapped to select the species, that added one to the count), and you'll return to the main screen showing 45 Cedar Waxwings. The minus (–) button is there if you make a mistake and want to subtract out a quantity, and the equals sign (=) is there if you simply want to set the number to a certain number. If you see a huge flock of Western Gulls and you count 1050 of them, tap the species once to highlight it, then tap the calculator and enter 1050 and then tap the equals sign (=) to set the count to that number (or you could enter 1049 and then tap the plus sign; the result is the same).
In the paragraphs above we described the "standard" behavior of the software — tapping a species for the first time marks it as seen and sets the count to 1. There are situations where you may wish to change this behavior. The firs is to make the first tap Default to "Present" (that is, a species you have seen or heard and noted as "present," but you don't intend to count, even though you do intend to count other species). If you tend to count just a few "noteworthy" species, and leave the rest uncounted, setting Default to "Present" to On will save you time and effort.
The second behavior you can change is to set Default to "Heard" to On. In this mode, the first tap will set the species to "heard only" and display and ear icon next to it. Tapping on the ear within one second changes the sighting to a "seen" sighting and the icon to a binoculars, exactly the opposite of the standard behavior. And, just like the case when Default to "Heard" is Off, you can always edit the sighting (as described below) to change the "heard only" status to the correct value.
Both of these settings can of course be changed whenever you want. If you're birding in the woods one day, you might set "Default to Heard" to On, while on a day you're birding at the bay or ocean you can turn it Off.
To get to the Location screen, tap on the location button in the top center of the main screen.
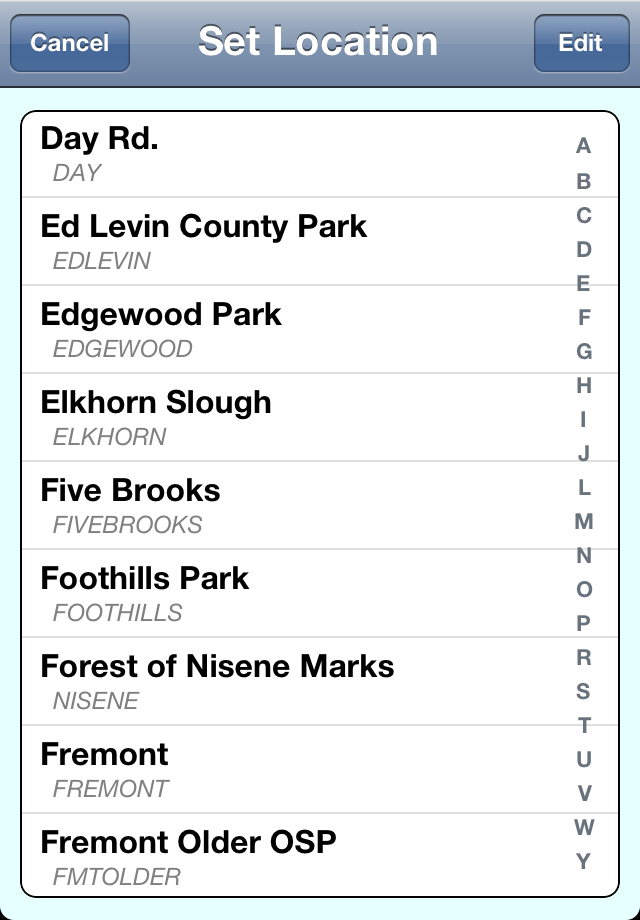
To select a location for your trip, just tap on the name of the location, using the alphabet key which appear down the right-side to scroll quickly to the location of interest if you have many of them. To modify the details of a location tap Edit and then tap the "detail disclosure" icon (the white arrow in the blue circle) to the right of the name. To add a new location, tap Edit and then tap the + button. When you do either of those things, you'll see this screen, titled either "New Location" or "Edit Location", as appropriate:
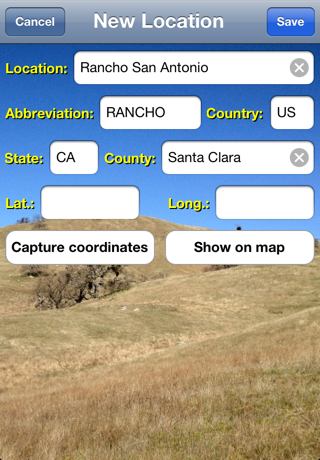
The Location name can be as long as you want. The Abbreviation is used on the bottom center of the main screen. We suggest abbreviations in the range of 4-10 characters, although if you use longer abbreviations, the font size used will shrink so it will fit on the main screen. We also suggest ALL CAPS abbreviations so they will stand out and, elsewhere in the software, be clearly distinguishable from the actual name of the location, but that is optional. As you enter a new location, the software automatically copies the first 10 alphabetic characters (not including spaces) into the abbreviation field, but you can then change that if you wish. The Abbreviation is what is saved with each sighting, so when you add a location, give it a bit of thought, since you won't be able to change it. Country, County, and State aren't absolutely essential, but are provided for the ability to export that information to external software including eBird, and also for use in filtering life list searches. Note that if you plan to export sightings to eBird, the required country abbreviation for the United States is "US", not "USA".
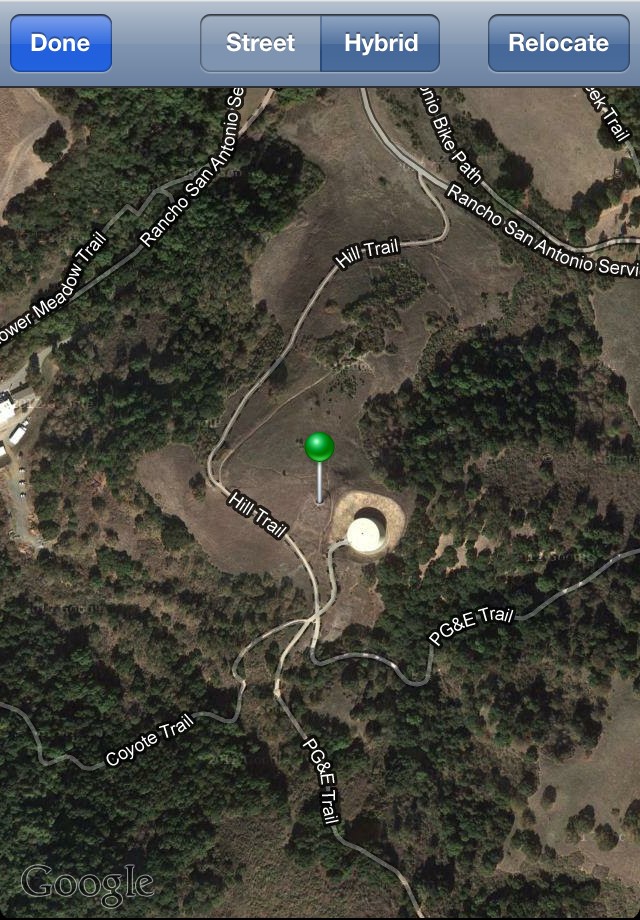
Finally, we come to the coordinates of the location — Latitude (Lat.) and Longitude (Long.). Depending on your hardware, there are two different ways to obtain this information (actually three, since for some locations you probably can look up the coordinates online and just type in the values). If your unit is equipped with GPS, and/or is in a location where triangulation from either WiFi signals or cellular signals is sufficiently accurate, and you are currently at the location in question, tap Capture Coordinates to capture the latitude and longitude (note that you must have "Location Services" turned on in the iPhone Settings app and with access by Birdwatcher's Diary allowed, or the Capture Coordinates button will not appear). If your unit isn't appropriately equipped, or you are setting up the locations at home before your trip occurs (in other words, you aren't actually at the location, so GPS won't help you), the second method is to tap Find on map. This method will display a Google Map (which means your unit will need to be online, either via WiFi or cellular connection) like this:

Tap Relocate and then use standard scrolling and zooming techniques to zoom in on the location of interest. Note that in addition to putting two fingers on the screen and spreading them apart to zoom, you can also just double-tap on the screen. As you scroll and zoom, the cross-hair cursors move with you, until you finally end up with something like this:
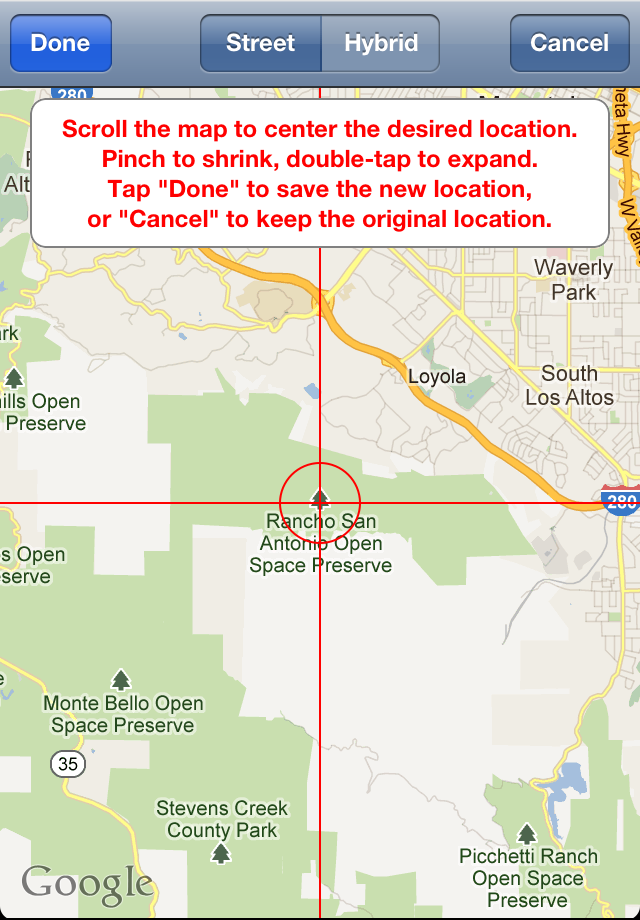
Where you center the location is up to you; it's obviously somewhat arbitrary. When you're satisfied, tap Done to return to the main Location screen where the latitude and longitude will now be filled in with the values from the map.
Finally, tap Save to save the information about the new location.
What is a location?
Exactly what you establish as a "location" for the purposes of the software is entirely up to you. It could be as small an area as your backyard, or as large an area as a state or even an entire country. Most likely all the local spots that you bird frequently should have their own unique location in the software. But if you're only likely to make one trip to, say, Panama in your life, you might well just set "Panama" as a location, and use the Trip Notes field (to be discussed below) to enter more detailed information about the specific location or locations that you actually birded on any given day. Of course if you're recording GPS coordinates for each sighting, those too will specify the precise location of the sighting. But, even if you're only going to visit Panama once, you can, if you want to, establish multiple "locations" for that trip. It's entirely up to you.
If you're an eBird user, you should be aware (and probably already are) that eBird has many of its own "locations" already established (basically because of other users entering data for those locations). eBird calls locations "HotSpots," although the birding at that location isn't necessarily "hot"! If you establish the names (not the abbreviations, which are basically internal to Birdwatcher's Diary) of your locations to match the names of already established eBird locations, then as your sightings are transferred to eBird, they will automatically show up in the "correct" location.
It's impossible to create a "location" to correspond to every single place you spot a bird you want to record. Perhaps you spot an Osprey while you're driving on the highway. You could create a "location" named "Hwy. 280", but then maybe you'll need another one named "Hwy. 85" and another one named "Hwy. 101". Besides, "Hwy. 280" might be 70 miles long, so as a location, it's not very specific! You simply can't create a new location each time, and really need to set up locations only for your "main birding spots," typically local parks and open space preserves, plus probably one called "Home". So what to do about the other sightings? Birdwatcher's Diary automatically includes a "location" named "None", which of course doesn't mean you were nowhere when you made the sighting, but simply that it wasn't at a "named" location. "None" is always displayed on top of the list of locations. You can delete (using the standard iPhone "sideways swiping motion" on the name, followed by tapping the Delete button which appears) or rename (using the Edit Location screen) any of your other locations, but "None" is permanent (ensuring that there will always be at least one "location").
To display (or modify) information about a particular sighting, tap on the binoculars or ear icon to the left of the name of the bird (except within the first second of adding a sighting, in which case tapping on the binoculars ("seen") changes to the ear ("heard only")). You'll see this:
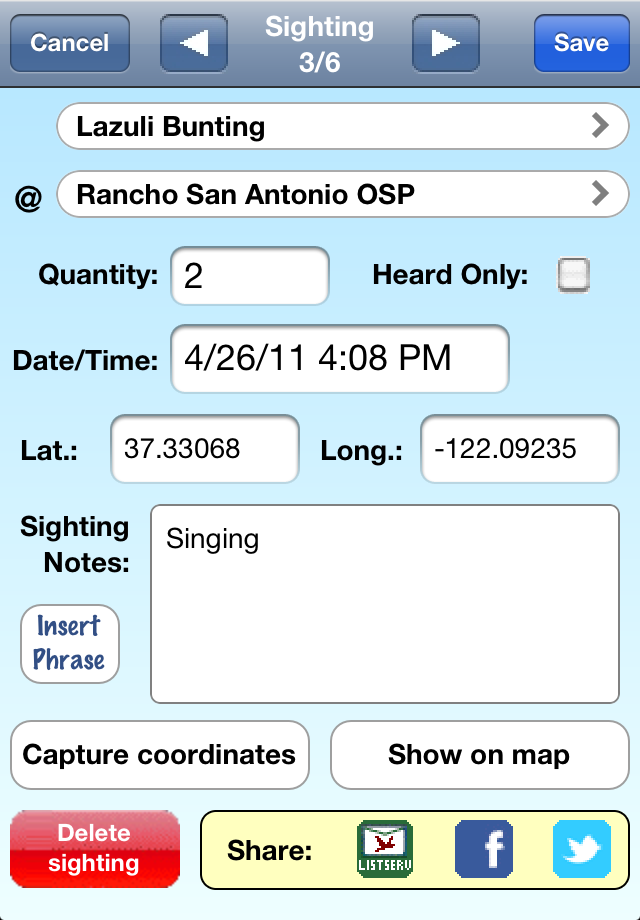
This screen displays, and allows you to modify, many aspects of a sighting:
Tap Done to return to the Sighting screen, or tap Relocate if you want to change the location of the sighting. The recorded coordinates (and the pin location) show where you were standing when you saw the bird, so if you want to record the actual location of the bird itself, this provides you a way to do that.
More now about some of these features:
To insert a standard phrase in your sighting notes, just tap on Insert Phrase, and a scrollable list of phrases will appear:
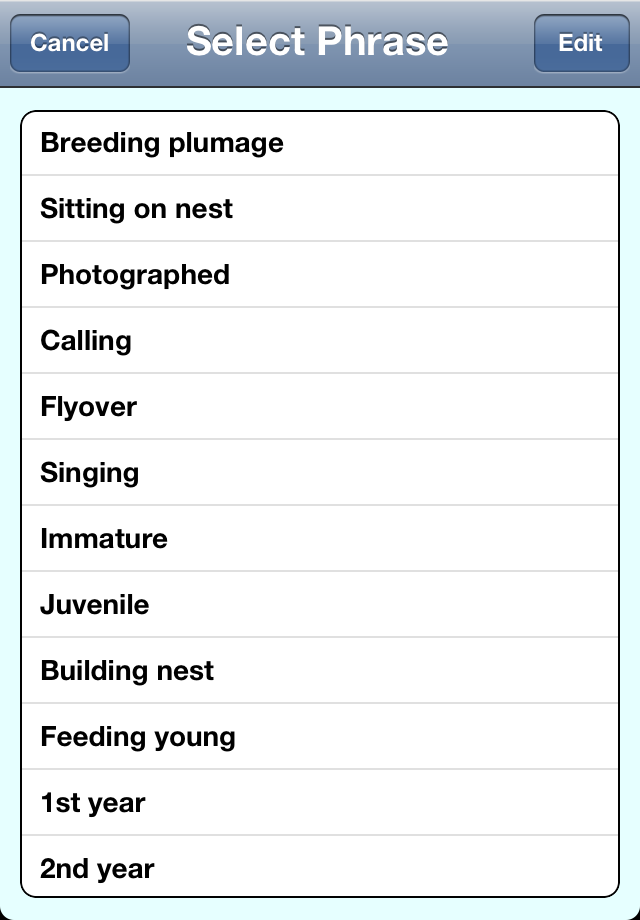
Tap on any phrase and it is inserted into the Sighting Notes. Tap on another phrase to insert another note, separated automatically by a comma, or tap in the Sighting Notes field to use the keyboard to enter your own words. To add your own word or phrase to the list for frequent use in making notes, or to delete existing phrases or to re-order them so that your most-used phrases appear at the top, tap on the Edit button. Now tap on the + button to add a new item, the minus sign on the left side of each item to delete that item, or use the "handles" on the right side to move an item up or down to reorder the list. Tap Done when you are finished modifying the list.
In general, Birdwatcher's Diary records the details (time, coordinates) of only one sighting of a species at each location. If you tap the name of the bird on the main screen multiple times, the quantity is incremented, but the coordinates and time are not changed and only correspond to the very first sighting. In some cases, however, you may wish to record the coordinates and time of every sighting. Perhaps you are doing a survey of all the Bluebird boxes in a particular preserve, or want to record the location of every Burrowing Owl burrow. Setting the Multiple Sightings setting to "On" activates this mode. Then two additional settings, Min. Time and Min. Distance, specify how far away you have to be to record a new sighting when you tap that species. Min. Distance applies if you have GPS enabled, while Min. Time applies if you do not. So with GPS enabled and Min. Distance set to 1000 ft., for example, if you tap on a species and move less than 1000 ft and then tap again, you will have one sighting with a count of two. If you moved more than 1000 ft. between taps, then after the second tap you would have two sightings with a count of one each.
When you have multiple sightings enabled, if you are displaying sightings from the current location only (on the top right of the main screen, the globe with the red pin is highlighted), then there is a special mode for the display of the sightings:
![]()
The number superimposed on the binoculars represents the number of sightings at this location, while the number to the left of the name of the species is the number of birds observed in the most recent sighting. This makes it easy to confirm that a new sighting has been recorded. If you are displaying sightings from all locations (the plain globe on the upper right of the main screen), then the number adjacent to the name of the species shows the total count of all birds of this species, and will simply increment with each tap.
Multiple Sightings mode, as described above, lets you record information (time, coordinates, notes) about multiple sightings of every species that you see. This may not be the best choice. While you might want to record information about multiple sightings of an "interesting" species like a Pileated Woodpecker, recording the time and location of every sighting of a Turkey Vulture or Chickadee is unlikely to be useful either to you or to another birder. For this reason, Birdwatcher's Diary provides an alternative way to record a new sighting of a species (again, by "new sighting" we mean a new sighting at the same named location, not a new sighting at a new named location, which is always recorded). When you arrive at the Sighting Screen, and you are looking at the most recent sighting (which will always be the case when you open the screen), the right arrow button shown above will not appear, but in its place will be a "+" button.
![]()
Tapping the + button adds a new sighting of the species, using the current time and coordinates.
"Power-user" feature: Adding a sighting from earlier in the day There is a second use for the + button. It can happen that at some point during your birding day you'll realize, perhaps in comparing notes with a companion, that you forgot to record a species earlier in the day. You can record it now, but then the time and coordinates will be incorrect. You can correct both of these problems on the Sighting Screen (changing the time, and using the Show on Map and then the Relocate buttons to move the sighting to the correct location), but there is a better way if you know that the missing sighting occurred at about the same time and place as another sighting which you did record. If so, from the main screen tap on the binoculars (or ear) icon next to that sighting to view the details of that sighting. Now, instead of tapping on the + button, hold your finger down on the button for 3/4 second. A new sighting is created using exactly the same time and coordinates as the original sighting. Now tap on the species name, select the correct species, and Save the new sighting. |
Birdwatcher's Diary provides three different modes for recording the precise coordinates of each sighting, controlled by the Lat./Long. setting. All Sightings uses either GPS (if present, as it is on the iPhone 3G and 3GS and the iPad with 3G service but not on the original iPhone, the iPod Touch, or the iPad with WiFi only) or WiFi or cell tower triangulation to pinpoint the coordinates (latitude and longitude) of each recorded sighting (either the first sighting at each location or all sightings, depending on the Multiple Sightings setting).
You may not want to record the precise location of every bird. Perhaps you only want to record "special" birds, like a Pileated Woodpecker or a Bald Eagle. In that case, set Lat./Long. to Manual. In this mode, when you want to record the coordinates of a sighting, you edit the sighting as described above, and use either the Capture coordinates or the Show on map button to record the coordinates. Other sightings adopt the general coordinates of the location itself.
The third mode is called No Location Sightings. With named locations, you will at least know you saw the bird at Arastradero Preserve, or Rancho San Antontio, etc., and, if you have set the coordinates for those overall locations, the software will know approximately where the sighting occurred. But when the location is set to the special value "None," the software has no information about where you are, so there are no approximate coordinates (the coordinates of the location itself) to rely on. So if you set Lat./Long. to No Location Sightings, when and only when you have the "location" set to "None," coordinates of each sighting will be automatically captured and recorded. When you are at any named location, No Location Sightings functions exactly in the same way as Manual, that is, it does not record coordinates for any sighting automatically, but of course you can always do so manually for a bird of interest.
Of course you can always modify or update the coordinates of any sighting, no matter what the mode you have chosen, using the Capture coordinates or the Show on map buttons.
So that you'll know the status, the color of the text on the bottom of the screen showing your current location changes color based on the current accuracy of the reading, compared to the value of Max. Inaccuracy, which you can set to values of 100 meters, 250 meters, 500 meters, or 1000 meters (For the metric-challenged, a meter is approximately one yard; 1000 meters is approximately 0.6 mile, and for the technically-minded, this is really "precision," not "accuracy"). If the inaccuracy is 150% or more of your desired accuracy, the text will appear in red; between 100 and 150% and it will be yellow, and if it is less than or equal to your desired accuracy, the text will be green. If you are not currently in a mode where you are recording coordinates (either Manual mode, or No Location Sightings mode and a location other than "None"), the text is white.
If you are recording sighting coordinates automatically, and you tap on a bird when the text is red or yellow, the software will decline to record the coordinates, notify you that it is doing so, and give you three options: Try Again will re-measure the location and attempt to get better accuracy, and Record Anyway will record the sighting without specific coordinates (which will be equivalent to the "generic coordinates" you established for the overall location).
Depending on the kinds of places you bird, and the density and proximity of cell-phone towers, you may find that capturing coordinates (either automatically for each sighting or manually for special sightings) is insufficiently accurate to be of any use whatsoever unless your unit is equipped with GPS. If your unit does not have GPS, you most likely will find that, outside of urban settings, only the Manual mode of recording coordinates, and only the Find on Map method of specifying the coordinates, is of any use.
Recording Altitude:
In addition to latitude and longitude, some people, particularly ornithologists recording sightings in mountainous regions, find it desirable to record altitude as well. A Record Altitude setting lets you activate that feature. Because we believe that most people won't want or need this feature, the software doesn't provide a separate "field" for the altitude information as it does for latitude and longitude. Instead, it simply records the altitude in the Note field of the sighting.
The Folder icon on the main screen brings you to the Archive/Input/Output/Lists screen, which looks like this when in Archive mode (as selected on top of the screen):
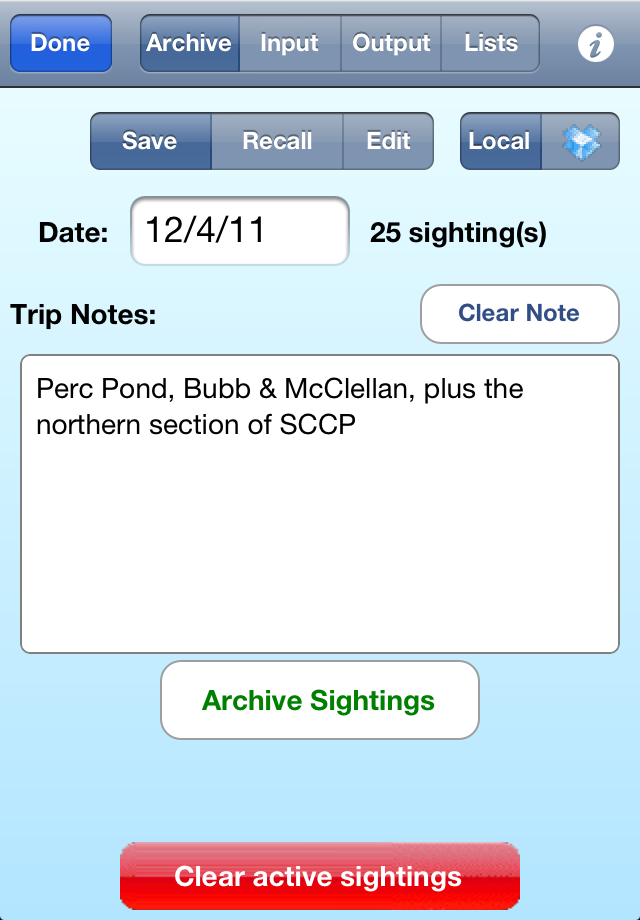
At the end of each day's sightings, we recommend visiting this screen. The software keeps track of the date of your most recent sighting, and it will appear in the Date field, although of course you can change it. The number of sightings for that day is displayed, which will help confirm that you've got the right day. Enter some Trip Notes to describe the trip, after (typically) first using the Clear Note button to erase the previous notes. Finally, tap the Archive Sightings button at the bottom to actually save the data into a file on the iPhone (it's automatically named so you don't need to provide a name). After you have saved your data, if you add or delete a sighting, or you decide to update the Trip Notes, just return to this screen and tap Archive Sightings again; the updated data will replace the earlier data (after you confirm that you really do intend to overwrite the previous archive for that day with the new archive). If you're done with birding for the day, and have saved or outputted your data in one or more formats, feel free to go ahead and tap Clear all sightings to be ready for your next outing.
Archives are always daily, with a maximum of one per day
The archive system built into the software is designed as a daily archive. Each archive contains only a single day's sightings, and there is only one archive per day. This allows the software to generate internal filenames without having to trouble you with naming each archive, and later recalling the name that you used, as you have to do with "normal" files on your desktop computer.
As you'll see shortly, when you want to recall older sightings (that is, archives from previous days), it's a simple matter to recall multiple days at the same time, so if you've taken a multi-day trip, you'll be able to see the complete list from the entire trip with no problem. However, each day of the trip will be stored in its own archive.
It is possible to record multiple day's sightings on the main screen, if you simply continue from one day to the next without archiving each day and without clearing the sightings to begin the next day anew. However, if you do that, either deliberately or accidentally, and then want to archive the data, you will still need to archive each day of the multiple days one at a time. You do this simply by changing the date on the Save Archive screen and then tapping Archive Sightings to archive the sightings for that particular day.
Of course, if you routinely output (described below) your sightings to, e.g., eBird or some other desktop-based or web-based software, you don't need to archive the sightings within Birdwatcher's Diary at all. We recommend you do so, however, because the archives take up very little room in the memory of your unit, and they will make the software that much more useful to you as time goes on.
On the top right of the Archive->Save screen you see two buttons, one labelled Local and the other with this icon: ![]() This is the icon representing Dropbox, which is a "cloud storage" service with which Birdwatcher's Diary is integrated. You can read more about Dropbox in this separate document, and you can get your free account by clicking here. Once you have a Dropbox account, you can turn on Autosave Archives. If you do so, whenever you press the Archive Sightings button, your sightings will not only be saved to a file on your iPhone, but will also be uploaded to your Dropbox account. If Autosave Archives is set to Off, you can still manually save an archive of they day's sightings to Dropbox by selecting the Dropbox icon on this screen, and then tapping Archive Sightings.
This is the icon representing Dropbox, which is a "cloud storage" service with which Birdwatcher's Diary is integrated. You can read more about Dropbox in this separate document, and you can get your free account by clicking here. Once you have a Dropbox account, you can turn on Autosave Archives. If you do so, whenever you press the Archive Sightings button, your sightings will not only be saved to a file on your iPhone, but will also be uploaded to your Dropbox account. If Autosave Archives is set to Off, you can still manually save an archive of they day's sightings to Dropbox by selecting the Dropbox icon on this screen, and then tapping Archive Sightings.
Users who have upgraded from an earlier version (4.3 or earlier) of Birdwatcher's Diary may want to save all your existing archives to Dropbox. To do this, tap the Dropbox icon on this screen to select it and then hold your finger down on the icon for 3 or more seconds. A message will appear asking if you want to upload all your existing archives or only all your "new" archives (the ones that the software does not find already archived to Dropbox). Select one of those options (or tap Cancel) and the archives will be transferred to Dropbox. Even if you aren't routinely saving archives to Dropbox, this is an ideal way to transfer your archives from one device to another (for example, for your iPhone to your iPad). Upload your archives from one device and, as described in the next section, download them all into the second device.
To recall previous sightings, tap the Recall button, and the screen's appearance will change so that it looks like this:
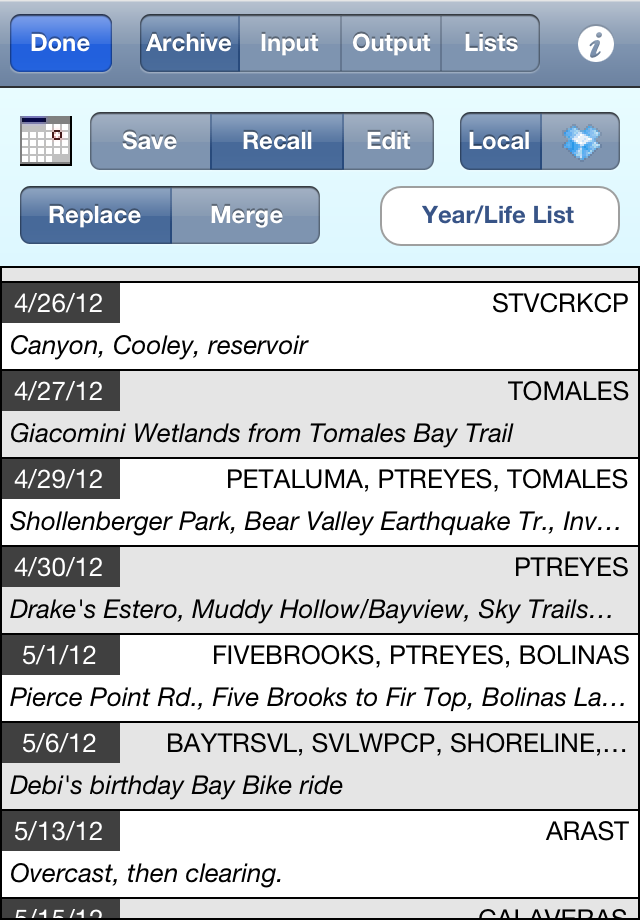
The main part of the screen is occupied by a list of your stored files in chronological order, latest at the bottom. The list will automatically scroll to the bottom when you first view it so you'll see the most recent sightings; scroll up to view earlier days. To scroll to a particular date (perhaps the date of last year's CBC or birdathon), tap the calendar icon and select the date you want.
The screen shows the date of the trip, the one or more birding locations you visited during the trip, and the first part of your trip notes to help you decide which is the correct entry. Tapping any entry will recall the sightings from that day's trip. Replace or Merge specifies what will happen when you recall the sightings. If Replace is selected, those sightings will now be the only sightings displayed on the main screen of the software, while if Merge is selected, those sightings will be added to those already on the main screen.
If you have archives saved in your Dropbox account, tapping the Dropbox icon will change the appearance of the screen, like this:
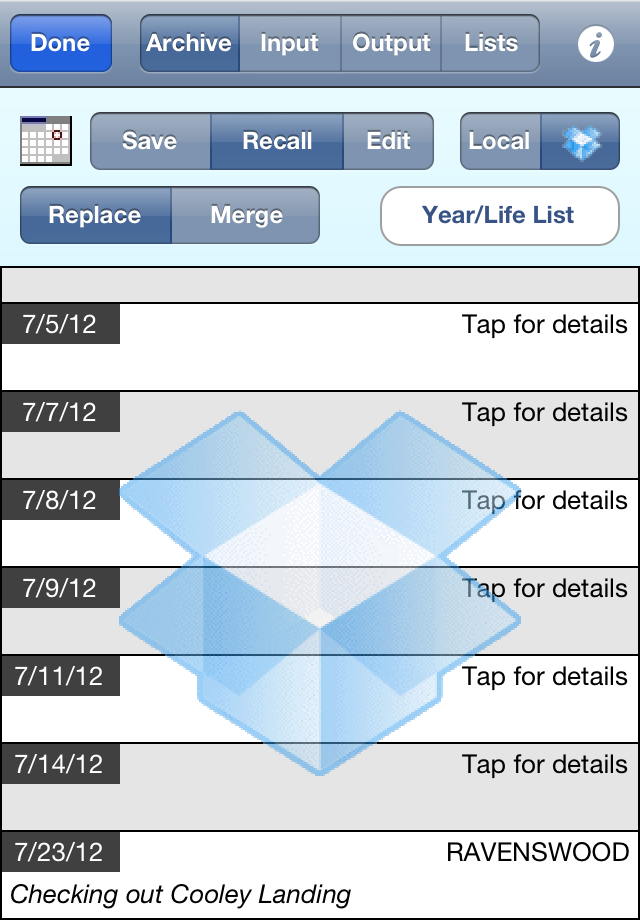
What you see is a list of files stored in your Dropbox account, with a large Dropbox icon superimposed over them to remind you that these are "cloud" files you are looking at, not local ones. At first the software only knows the date (which is part of the name of the file; all the information is in the file itself). If you aren't sure which archive you want to recall, tap on it, and the software will read the file and show the location(s) and comment as it does for local archives. Once you see this information, tapping again on that item will recall that archive, just as it would for a local archive.
To download all your Dropbox archives (for example, if you are installing your data on a new device), hold your finger down on the Dropbox icon for 3 or more seconds. You'll be asked if you want to download all the archives, or just the "new" ones (the ones that aren't already on your device). Note that the software only knows the date of the file when determining if a file is "new." If you make changes to a particular archive, you'll need to download that archive specifically.
As most birders know, particularly those who record their sightings, periodically the birder's world is treated to the phenomena of "splits" and "lumps." Two sub-species of the same species are now treated as two separate species, or, conversely, two separate species are now treated as two sub-species of the same species. There are also cases of simple re-naming of species. In all these cases, if you have sightings recorded in your Birdwatcher's Diary archives, those archives are suddenly "wrong." What to do? You'll find step-by-step instructions for updating your old sightings in a later section of this manual.
Instead of recalling just one day's sightings, you may wish to read in a group of sightings. Reading in all the stored data (note: you can only do this from your "local" files, not from your Dropbox archives) will produce a "life list," or at least as much of a life list as you have been recording with Birdwatcher's Diary. But you may wish to produce a life list which is restricted in some way – by date, by location, by state, etc., and Birdwatcher's Diary is designed to let you do that as well. To create any list (full or partial), tap the Year/Life List on the screen above and you'll see this screen:
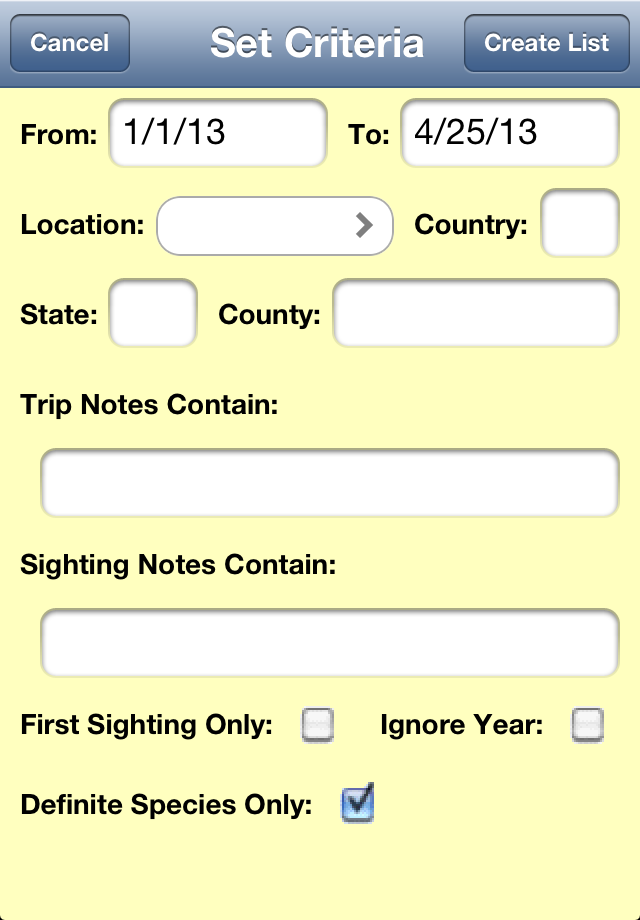
The various options are:
You can use multiple criteria at once, so, for example, you can generate a list restricted to the species you've seen in Santa Clara County during the month of May which you have photographed.
Once you've entered your criteria, tap the Create List button on the upper right (or tap the Cancel button to change your mind). The software will make a temporary backup of your "active" sightings (so you won't lose them and can quickly return to them), generate the list, and display a summary of what you've produced, like this:
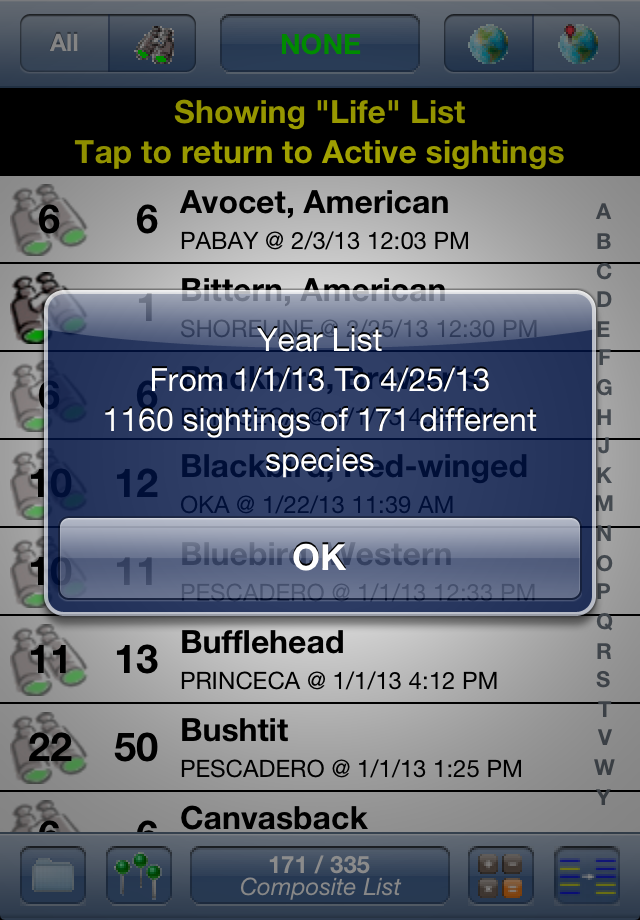
On the main screen (behind the popup message in the image above) you see the list of the different species which fit the criteria, along with the total number of birds of each species (the main number displayed to the left of the species name) and the total number of sightings of each species (the number superimposed on the binoculars icon). If you have the display set to show date and time on the second line, you also see the date and time of the first sighting of that species (during the time period of the search).
On top of the screen you see a message letting you know that you're looking at a recalled "life" list and not at your currently active sightings. To return to your list of current sightings, tap where indicated.
To review all the sightings of a particular species (assuming you did not check the First Sighting Only box), tap the binoculars icon and the complete recorded details of the last sighting of the species will be displayed on the Edit Sighting screen. Now you can use the back (and forward) arrow icon on the top line of the screen to page through the different sightings of that species. When you tap the Show on Map button on that screen, you'll be asked if you want to display a map of just the sighting being displayed or all the sightings of that species. Choosing the latter will then produce a map of all the places in the world that you've seen that particular species.
"Power-user" feature: Finding your way back to an earlier sighting Perhaps you saw and recorded an interesting species (perhaps sitting on a nest) on an earlier trip, and you want to find your way back to that exact spot. Create a "life" list (or, more likely, a filtered list limited to the location at which you are birding) as described above, then tap the binoculars icon for the species in question. Now tap the Show on Map button, selecting "all sightings", and you'll see a map of all the sightings of that species at this location. In the lower right of the map, you'll see a "Where am I?" button |
There is one subtle point when recalling archived data (and life lists, which are just a way of recalling more than one set of archived data at a time). If a sighting includes a bird which is not part of the currently active master list, it will be added to the list. If, for example, your currently active master list is your state list, a recalled life list will still include birds you saw in other states or countries (unless you limited the criteria for the search, of course), and the name of the list displayed on the main screen will change to "Composite List." Typically you'll want to recall a "real" list (e.g., "United States" or "California" or whatever) before you start to record new sightings.
The final option on the Archive/Input/Output/Lists screen is Lists, which allows you to save and recall master lists of birds. While Birdwatcher's Diary includes Enhanced Intelliscroll™ for what we believe is the fastest possible method of searching through long lists, you'll be able to tick off the bird even faster if you are using a shorter list containing only the birds you might possibly see. Having the software search through a complete list of world birds makes no sense; even searching through a complete list of North American birds may be unnecessarily time consuming.
In Recall mode, the Lists screen looks like this:
The United States, United Kingdom, and Mexico lists are automatically included when the software is installed. You can create your own lists (explained in a moment), so you can have special lists which are the list of potential targets for birds for a birdathon or "big day," lists specifically designed for Christmas Bird Counts, etc. Shorter lists not only make it even faster and easier to find and tick a species, but also let you switch to a list of species you haven't seen, something which would have little or no value with a list of, say, an entire country.
There are two options when you recall a master list: Replace and Merge. In Replace mode, the list you recall you completely replace the list you have been working with, and will delete any existing sightings which you have recorded on the main screen. Typically you will only load a new list when you have gone to a new county, state, or country, and are just beginning birding, so this won't be a problem.
Merge mode has two principal uses. The first is to expand your list by geography. Let's say you are working with a Santa Clara County list, and you see a first sighting for the county. Or perhaps you just stray over into San Mateo county, and see a species which isn't on the Santa Clara County list. If you don't have any sightings recorded, you can just recall a "bigger" list (e.g., a California list) using the Replace mode, but if you do have sightings recorded, just recall the bigger list using Merge mode. This will merge the two lists (that is, it will not produce any duplicates), without affecting the sightings you've already recorded on the main screen.
The second use for the Merge function is to merge a separate list of so-called "spuhs" like "Gull sp" into a main list which doesn't include them. Our standard lists (United States, Mexico, United Kingdom) contain only "real species," not "spuhs." If you create a separate list of the latter, you can use the Merge function to merge those in with any of the other lists. This is something you'll probably want to do for a Christmas Bird Count.
Default is one special case on the list of master lists that you can recall. It's "grey'ed out," but that doesn't indicate it's not active, only that you can't delete it (you can delete any of the others by swiping to the right and tapping the Delete button that appears). Default will restore the "factory default" list that appeared when you first installed the software, which is either the U.K. list if your iPhone is configured to indicate that's your home, the Mexico list if that's where you are, or otherwise the U.S. list.
Another choice on the Lists screen is Download:
After checking with the Stevens Creek Software website, this list will display a list of all of the lists which we have currently available, which include all 50 states, dozens of countries, and other specialized lists (e.g., a list of all the "spuhs" recognized by eBird). Names in gray are those which the software found that you have already installed. Just tap on a name and it will be downloaded from our website and saved to your device, and also made into the active list.
The Save lists screen is much simpler:
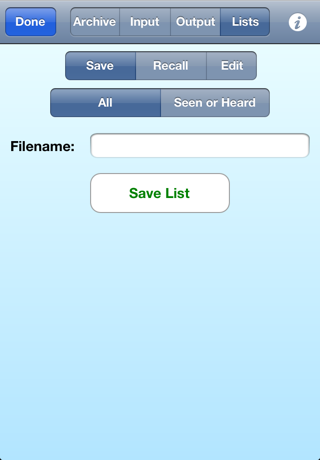
Filename is the name which will appear in the list of master lists on the Recall screen. Unlike other filenames we use for input and output in the software, in this case you will not want any kind of extension (e.g., ".txt"), just the name of the list (e.g., "My Backyard"). Internally, the file is given a ".txt" extension, but you'll never see that unless you export the list to your computer as described below in the Output chapter.
The Seen or Heard option is the simplest way to save a new list if you are creating a shorter version of an existing list. Perhaps you would like to take one of our state or country lists, and make a list of only the species which are regularly seen in that state or country (the standard lists contain every species which has ever been seen, even just once or twice). Another thing you might want to do is to make a target list for your Big Day effort, by pruning a county or state list to contain only those species that you have any chance of seeing on the chosen day. To do this, load the main list that you want to start with onto the main screen, and then go through the list, tapping on all the species that you want on your shorter list. Now come to the Lists screen, select Save and then Seen or Heard, and when you tap Save List, a new list of only those species will be created, ready to be recalled at any time. You'll probably want to then go to one of the other screens to tap the Clear all sightings button, since these were of course not actual sightings you wish to save.
All will save the complete list of species on the main screen. But how might that have changed? First, you could have used the Input section of this screen (described below) to read in a text file containing the new list, and now you simply use the Lists screen to save that list directly on the iPhone, where it will be available at any time, without having to download it again. Or second, you may have modified one of our standard lists. Perhaps there has been a "split," and we haven't updated our master list yet. You could simply add the new species (as described in the Edit Species section below), come to this screen, and save the list (it's ok to save a list by the name of an existing one; you'll be asked to verify that you want to overwrite the old copy). Or if there was a "lump" (two species now considered one species), you could use the Edit Species screen to delete the species which "no longer exists," and then save the list using this screen (again, simply overwriting the old copy).
To add a "new" species to a list (not reallly "new", presumably, just new to that list), scroll to the very bottom of the list on the main screen (just tap the "Y" or "Z" to do so) and you'll see a button reading Add species to list. Tap that and you'll get to the Species screen. To delete, modify, or just view the information about a species already on the list, or to add a picture of that species, find that species on the list, and hold your finger down on the species for 2 or more seconds. You'll see this screen, either blank if you are adding a new species (with the top reading "Add Species"), or already filled in (with the top reading "Edit Species Info") if you are modifying an existing entry in the list:
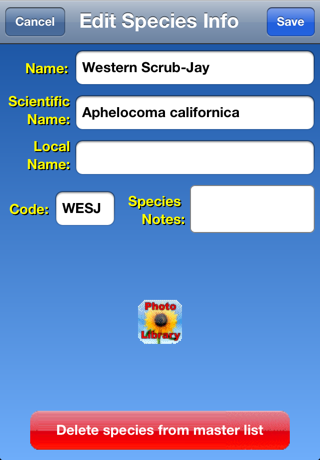
The Name of the species is just that. If you are adding a new species (or "pseudo-species" like "Gull sp.") do not enter it in "Last Name, First Name" order; if you typically sort in that mode, the software will take care of things for you. The only restriction in entering the name is that, if you do want to enter a generic name like "Gull sp." or "Dowitcher sp.", do so exactly like that, with a space and then the letters "sp" and a period (rather than, e.g., "Gull, sp." or "Gull (sp.)" or any other variation). This is because, when the software sorts the names in alphabetical order by last name, it knows to look for "sp." at the end and ignore it, so "Gull sp." will be sorted with the gulls and not with the sparrows.
The Scientific Name of the species should be self-explanatory. Local Name is a place to put the name of the species in a local language (Spanish, French, etc.) or a name in English but in "local English" (e.g., "Red-breasted Diver" in place of "Red-breasted Loon").
The Code is a place for a code such as the common 4- or 6-letter codes in use for bird identification, or any other coding system you want to use. Birdwatcher's Diary does not actually use this information itself unless you are sorting by code, but if you are exporting the data to other software which requires a code to properly read the information, then it will be essential.
Finally, Species Notes is a place for you to insert notes about the species which you'll find useful (notes about a particular sighting are entered on a different screen described above). You might add notes about the bird's song or call, its appearance, its behavior, or anything else of interest (perhaps you're a photographer, and you want to add a note like "need photo" as a reminder).
The Save and Cancel buttons are self-explanatory.
Delete species from master list deletes the species from the active list on the main screen of the software, but not the stored version of that list. In other words, if you recall the United States list and delete a species from it with this button, the next time you recall the U.S. list the species will reappear. To make the change permanent, you'll need to go to the Lists->Save screen described above, set it to save All species, and then Save it.
Click the Photo Library button and you'll be given a chance to select a photo from your library for the bottom portion of the screen. Once you do, the screen will look like this:
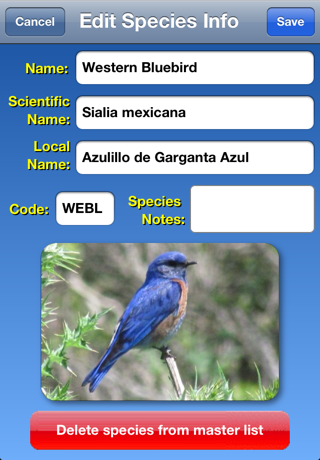
You can also add photos to be displayed in this way using iTunes file sharing or from Dropbox (see later in the manual). Any ".jpg" file that you add to the software will be placed in a special Photos folder inside the software. When you display a species, the software looks for a file by one of three different names, in this order: Local Name.jpg, Name.jpg, or Code.jpg, including spaces if they are part of the name of the species. In this example the software would look for files named Azulillo de Garganta Azul.jpg, Western Bluebird.jpg, or WEBL.jpg. If it finds any of those, the photo contained in that file is displayed.
You can import more than one picture of a species. Additional photos must have the same name as the first, but with "_2" (and "_3" etc.) added at the end, e.g., Western Bluebird_2.jpg. When more than one picture exists, you'll see the usual iPhone "dots" below the picture, and swiping your finger left or right (as appropriate) across the photo will switch between photos. Hold your finger down on a photo for 2 or more seconds and you'll be given a chance to delete that photo. Note that you can only read one photo from the iPhone Photo Library; reading in additional photos must be done using the Import functionality described later in the manual.
Periodically bird species are renamed (e.g., Common Moorhen to Common Gallinule), split into two species (e.g., Winter Wren into Pacific Wren and Winter Wren), or two species are combined or "lumped" into one (Myrtle Warbler and Audubon's Warbler into Yellow-rumped Warbler). We attempt to keep up with such changes with the lists that we make available, but it's not always easy or even possible to do so (for example, some changes may be recognized in one country but not in another). Furthermore, even if all our lists were updated instantaneously, there would still be the issue of the sightings you have already recorded and archived in the software.
For this reason, we have built a tool into the software to allow you to make such changes yourself. On the Archive and Lists screens, next to Save and Recall you'll find an Edit option. Tapping on this button will reveal the new Edit Lists & Archives screen:
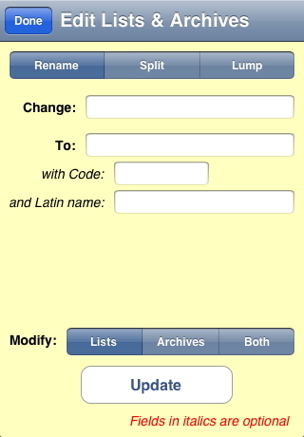
On top are the three different types of changes - Rename, Split, and Lump. On the bottom are the three choices for updating - Lists (only), Archives (only), or Both. In between are a number of fields which will change depending on which type of change you are implementing - splits and lumps obviously requiring more information than a simple rename. You must fill in the fields containing the names of the species - two such fields in the case of renames (as shown above), three in the case of splits of lumps. Bird-banding codes and Latin names (which go in the Note field) are optional; if you leave them blank and one of the names remains the same, they will be carried over (for example, if you split Winter Wren into Pacific Wren and Winter Wren, the existing code and Latin name for Winter Wren will be retained, while the code and Latin name for Pacific Wren will be left blank unless you provide it.
Archives contain only the species name, not the code or Latin name, so if you are only modifying your archives, you need not worry about the Code or Latin name values.
All three modes (rename, split, and lump) apply to Lists. Species in archives can be renamed or lumped, but they can't be split, since the software would have no way to know which of the two "new" species names was the relevant one. If there has been a split that affects your archives, you need to proceed as follows:
Let's say you want to deal with the split of Winter Wren. If your archives contain only sightings of the species which is still called Winter Wren, you obviously don't need to do anything to your archives. If they contain only sightings of the species which is now called Pacific Wren, just use the Rename mode, set the software to modify only Archives, rename your archives from Winter Wren to Pacific Wren, and then go to Split mode (which you don't actually need to do in this case, because the existing lists already reflect this split, but this is just an example) and apply the Split to Lists only. Now if you have archived sightings of both species, you'll need to go through your archives manually, after you have updated the lists. Here's a step-by-step example: Let's say you live in California and the bird formerly known as Winter Wren is now Pacific Wren (Winter Wren being the name for the eastern species), and that most of your sightings are of the species now known as Pacific Wren.
Here's how to update your sightings:
One special feature of the Edit Lists and Archives screen is that, when two species are lumped, when the software updates your Archives it will make a note of the original name in the Note field of the sighting. So if you had recorded sightings as Myrtle Warbler and Audubon's Warbler, and then lumped the two into Yellow-rumped Warbler, in the sightings of the former the Note field would read "Was: Myrtle Warbler" and in the latter would read "Was: Audubon's Warbler," so that you would still have a record of the appropriate sub-species.
In addition to its internal archives, in which you save and recall your sightings for different days, Birdwatcher's Diary allows you to output your sightings. It also allows you to input lists of previous sightings and master checklists of species for different locations. There are multiple methods for doing both input and output. One is via "file sharing" which uses Apple's iTunes software on the desktop to let you copy files from computer to iPhone and vice-versa. Another is Dropbox, a free (for a basic account) "cloud" service integrated with Birdwatcher's Diary (Read more about Dropbox in this separate document, and start your free account by clicking here). You can also email information (like a sighting report) directly from within Birdwatcher's Diary. Still another method of getting information into the software is by downloading directly from the web or from your own computer which has been configured as a "web server," and another method of getting information out of the software is by uploading using a technique called "ftp" (file transfer protocol). A final method which can be used for both input and output is the iPhone "clipboard." Information can be copied onto the clipboard in Birdwatcher's Diary, and then pasted into another application on the iPhone, such as Notes or Mail or Safari (which lets you create an email containing your sightings in, e.g., Hotmail and send it out right from the iPhone). Conversely, you can copy information from another application, perhaps a list of birds, and paste it into Birdwatcher's Diary.
There are other issues involved when files are input and output from th software as well. Depending on whether files contain only "plain" characters in the Roman (Latin) alphabet, or whether they contain accented characters or such things as "smart" punctuation, files can be "simple" text files or they may be the more unfamiliar "Unicode" text files. And, depending on whether the computer involved with the input or output is running MacOS, Windows, or Unix (Linux), the character or characters at the end of each line is different!
Suffice it to say that some of these subjects are rather complex, and you may not actually need to deal with any of them. For that reason, we cover them all in a separate document, which you can access by clicking here. To start with, you'll be most concerned with outputting data from the software to your desktop, and for that, you can start with email which is simplicity itself, involving only entering your email address and specifying what kind of computer you'll be reading the email on. You do both of those things (as well as all the other configurations necessary for the other methods of input and output, should you need them) in the iPhone Settings app in the Birdwatcher section. Dropbox is perhaps even an easier way to move files between your computer and your iPhone.
Before we discuss specifics of output and input, let's discuss iTunes file sharing in general.
Beginning with iOS 4, it is possible to share files between computer and iPhone. Files created on the computer can be installed in the iPhone, and files created on the iPhone can be transferred to the computer (the iPhone must be connected to the computer in order to do this). In iTunes (version 9.2 or higher), when you select your iPhone in the left (under "Devices"), and then select the Apps tab on the top of the screen, on the bottom portion of the screen (you'll need to scroll down) you'll see a section entitled "File Sharing."
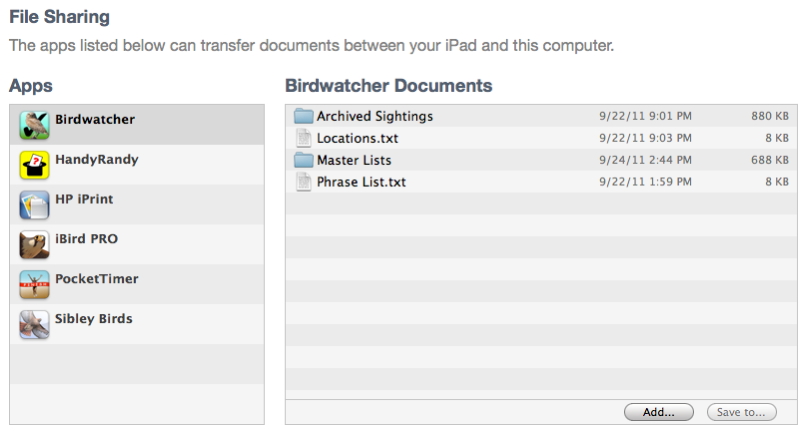
On the left will be a list of applications which support file sharing; Birdwatcher's Diary (labelled "Birdwatcher") will be one of them. Select "Birdwatcher", and in the right-hand column you'll see a list of the files on the iPhone that you can upload to your desktop. Locations.txt is a tab-delimited file of your locations including all associated information (state, coordinates, etc.). Phrase List.txt is a list of your stock phrases for use in sighting notes. Archived Sightings is a folder containing a series of files, one for each day's sightings that you have archived, named using a "YYYYMMDD" format (e.g., 20100713.txt). And Master Lists is a folder containing the various master lists of birds in your software. To upload any of these, highlight the file or folder, tap the Save to... button (which will become active when a file or folder is selected), and specify the desktop computer location where you want the file or folder stored. At this time, iTunes doesn't support opening folders, so the entire Archived Sightings or Master Lists folders must be uploaded at once, and not just a single file within them.
iTunes normally backs up all the information (including these files) whenever you sync the iPhone, but it does so into an encrypted file which is only accessible by iTunes itself. Saving these files (which are all simple text files) using the method described in the previous paragraph is an excellent way to produce a redundant and potentially more useful backup, and doing so periodically (and then transferring the saved files onto a separate medium like a CD, DVD, or online backup site like Dropbox) is a highly recommended option. You are spending a lot of time birding, and you wouldn't want to lose your lists!
To transfer a file into the iPhone, tap the Add button and select the file from your computer to transfer to the iPhone. You might, for example, share your Locations.txt or Phrase List.txt file with a friend who could then install the identical list in their copy of Birdwatcher's Diary. Or you might transfer your Phrase List.txt to your computer, add a bunch of phrases to it, and then transfer the revised file back to the iPhone, rather than having to enter the new phrases on the iPhone.
Because you can't transfer files into folders in the iPhone, you can't add files directly into the Archived Sightings or Masters Lists folders. However, Birdwatcher's Diary provides a special way to do that. If you add a file ending in .lst (e.g., MyState.lst), the software will recognize that as a master list file, and the next time you start the software, it will move the file into the Master Lists folder and change its extension to .txt. Similarly, a file ending in .bwd (e.g., 20110612.bwd) will be recognized as an archived sightings file, and will be moved into the Archived Sightings folder with its extension changed to .txt the next time the software starts. CAUTION: you should not transfer .bwd or .lst files into the software in this way unless you are absolutely sure their format is 100% identical to the standard format used by the software, because no checking of the contents of the files is performed when you do this.
Selecting Output mode on the Archive/Input/Output/Lists screen puts you into output mode:
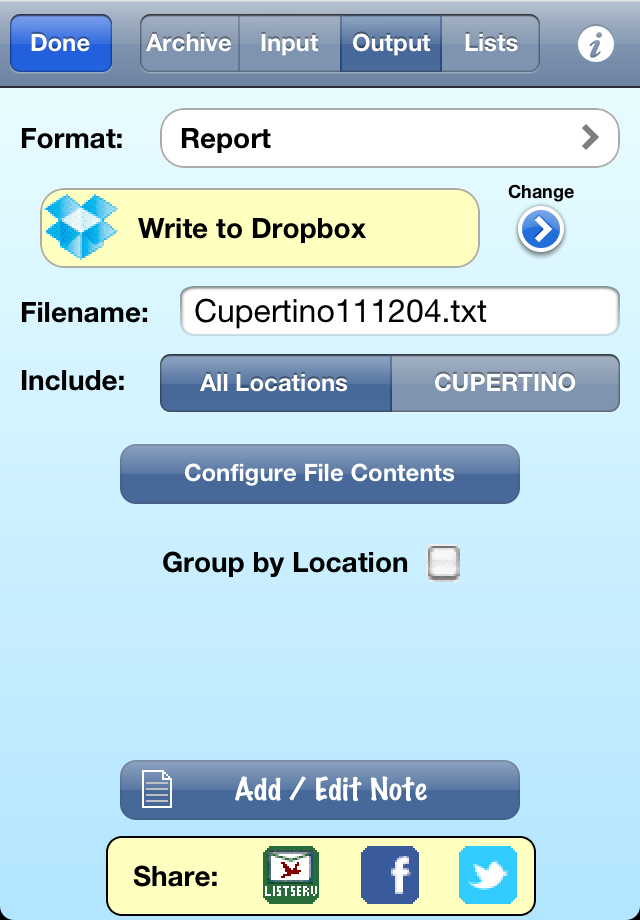
Let's start here with what we are outputting (uploading) and return to the how and where after that. There are two choices for what to Include:
There are two options in the Settings app which affect the output. Output Orderspecifies the way in which the output will be sorted, independent of the way in which they are displayed on the main screen of the software. The options for Output Order are the same as the main screen Sort order (Last Name, First Name, Scientific Name, Code, Taxonomic Order, and Time), plus one more: As Displayed (which outputs the information in the same order as on the main screen). Taxonomic Order is probably the most popular choice.
The second option is Group by Location, which is also accessible on this screen. Group by Location gives you the control over whether or not the output is grouped by location. If it is, and you birded five locations, you will end up with five sub-lists, each ordered as you desire, but no "master list" which groups all the sightings in that order. Conversely, with Group by Location turned Off, then the output will consist of a single list of species, order alphabetically, taxonomically, or in whatever order you choose. The one exception is that, if you output data to eBird, they are grouped by location no matter what the setting, because eBird requires that (since it treats each location as a separate "checklist").
The Format of your output has seven choices:
The Output Format Table which appears when you tap Configure File Contents is a scrolling list (that is, you need to scroll to see all the items on the list) of the various items which are recorded by each sighting (Name, Quantity, Date/Time, etc.). You use this table to specify exactly which of those items are included when you output your sightings in either the Report or Spreadsheet formats. Items on the left side of the table in bold are included in the output, while items on the right side of the table in italics are excluded. To move an item from one column to the other, just tap on the item. To re-order the items, grab the "handles" on the right end of each line and move the item up or down. There are two pairs of potentially confusing items in the list of items you can output or export. One is Sighting Location and Full Location Name. The former is the abbreviation for a location used by the software, and will be most useful when re-importing this data back into your or another copy of the software (perhaps a birding companion). The latter is, as it says, the full name, not the abbreviation. The other confusing pair is Note, which is the note attached to the species (often the Latin name of the species in the lists we provide), and Sighting Note, which is the note attached to a specific sighting of the species.
The Filename is of your choosing, but if you enable Auto Filename in Settings, then the name is automatically generated by combining the current location and the date. Even with Auto Filename turned on, though, you can still change the name if you want it to be something different.
In all formats, there is one additional piece of information which is output along with the individual sightings — your trip Notes. This is a place for you to record overall notes - the weather, your companions, or other general observations pertaining to the day as a whole. Tap the Notes button and a screen will appear allowing you to enter whatever you like.
When you select eBird, you'll see four new things used for transferring data to eBird:
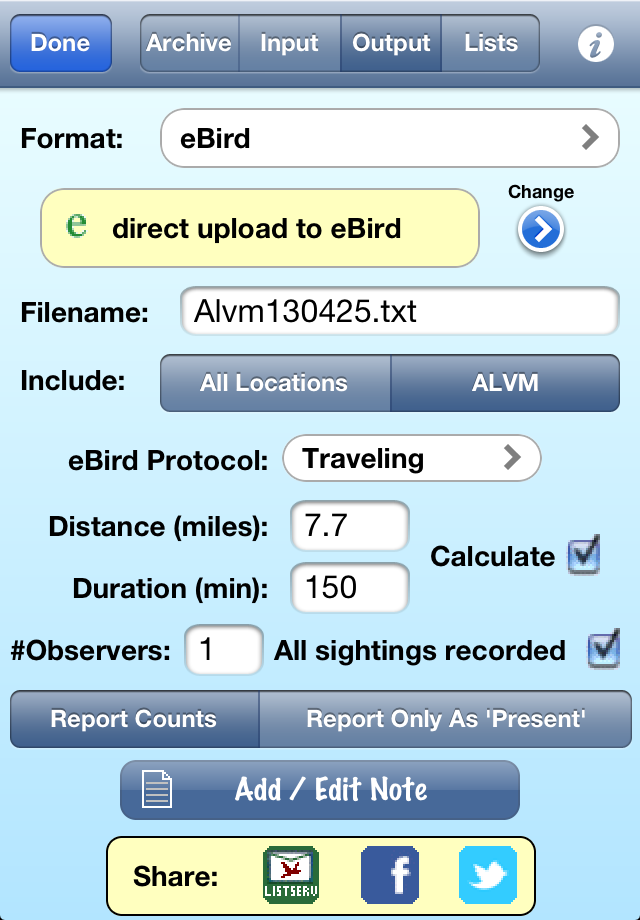
eBird has four "protocols" for reporting sightings – Casual, Stationary, Traveling, and Area. You can read the specifics at the eBird site, but for most typical birding outings, Traveling will be the protocol of choice. For the Traveling protocol, eBird wants to know the Distance you travelled and the time (Duration) you spent. You can enter these values manually or allow Birdwatcher's Diary to calculate estimates of those numbers by checking the Calculate box. The Duration calculation simply takes the time between your first sighting and your last sighting and rounds up to the nearest 15 minutes, which seems precise enough for eBird's requirements, and will work in all cases. The Distance calculation calculates the distance from one sighting to the next, which is obviously approximate since it assumes you walked in straight lines from one sighting to the next, but again, in most cases it will be perfectly adequate as an estimate (and of course if the estimates seem wrong you can simply uncheck Calculate and enter them manually.
Note that the manual entry will only work if you are uploading data to eBird for a single location. If you have data for multiple locations, and want to upload them all at once (that is, Seen or Heard is selected and not Location), then you must check Calculate to calculate the Distance and Duration at each location (if you don't, the same distance and duration will be uploaded to eBird for each location).
If you use the Area protocol, the word "Distance" will change to "Area", and only manual entry is possible (i.e., no automatic calculation).
# Observers is another parameter requested by eBird.
All sightings recorded is a question eBird wants you to answer. On most days, you'll be using Birdwatcher's Diary to record all the species you see, you the answer will be "Yes" and the box should be checked. However, if you have birded multiple locations in a single day (perhaps you were doing a birdathon, or "big day," or were simply visiting multiple locations), it may well be that you only recorded the first sighting of each species during the day. So you might have seen a Red-tailed Hawk at the first location, and recorded it, and then not bothered to record that species at any subsequent location. In this case, with the exception of the very first location, you are not recording "all sightings," and therefore the answer should be "No" and you will want to uncheck this box (if you're really a stickler for accuracy, you could submit the first location with the box checked, and the other locations with the box unchecked, but it will be a lot simpler and faster to submit all the locations at once with the box unchecked; you can always edit your uploaded sightings later to change the first answer to "yes" if you want to).
If you have not counted any species, but only ticked them off with all quantities as one, eBird does not want you to report them as quantity one, but as uncounted. In this case, however, you do not have to go through each sighting and mark them as uncounted as described above. Instead, when you go to transfer the results to eBird, you should select Report Only As 'Present' on this screen. If you have counted birds, then of course you'll select Report Counts.
Now, for all these formats, how is this information being output from your unit? There are several choices, which you access with the right arrow under the word Change. Once you have selected the format, tapping the main button (e.g., the direct upload to eBird button in the example above) performs the action.
One more parameter affects the output, and that is the Date/Time Format setting. Internally, the software always keeps track of both date and time, but you may not find that interesting or useful in files that you output. You can set the Date/Time Format to Date,Time, Date Only, or Time Only. In the latter mode, the date (if you are outputting sightings from a single day) is automatically appended to the Note field (on output only). And if you generate a Life List (or County List, Year List, etc.) and your preferred Date/Time Format is Time Only, the software will temporarily override that setting and include the dates and times, since your sightings were from different days so Time Only won't be very informative.
The Information ("i") icon on the upper-right gives you a choice of reading this online manual and registering your software with Stevens Creek Software (optional but allows us to provide you with support).
On the bottom of the screen are three icons:
Listserve (the icon showing an envelope with a bird on it ![]() ) allows you to send an email to your local bird listserve (or to anyone else, but that is the intended purpose) to inform them in a timely manner (while the bird is still present!) of a particularly notable sighting. The "To" address will be filled in with the Listserve Email address (from the Settings app). The Subject line is preset to with the birding location. The body of the email includes a summary of your sightings, a list of the sightings (with individual items controlled by the items which are in the "Include" column in the Output Format table), as well as a URL will take the recipients of the email directly to a Google Map with pins showing the precise latitude and longitude of each sighting. Of course you can change any of these things, or add additional comments, before tapping Send to actually send the email. Note that for this feature to work, your unit (iPhone/iPod Touch/iPad) must be configured to send mail using the Mail application, and the email will actually be sent only when you have internet connectivity.
) allows you to send an email to your local bird listserve (or to anyone else, but that is the intended purpose) to inform them in a timely manner (while the bird is still present!) of a particularly notable sighting. The "To" address will be filled in with the Listserve Email address (from the Settings app). The Subject line is preset to with the birding location. The body of the email includes a summary of your sightings, a list of the sightings (with individual items controlled by the items which are in the "Include" column in the Output Format table), as well as a URL will take the recipients of the email directly to a Google Map with pins showing the precise latitude and longitude of each sighting. Of course you can change any of these things, or add additional comments, before tapping Send to actually send the email. Note that for this feature to work, your unit (iPhone/iPod Touch/iPad) must be configured to send mail using the Mail application, and the email will actually be sent only when you have internet connectivity.
Why can't you just use the Email option above to do this? Because Listserves require that you send only "plain text" email (no fancy formatting), and you cannot send attachments to listserves. The email that the software sends to your listserve when you tap the Listserve button is specifically designed to meet these requirements.
Facebook (the "f" in a blue box icon ![]() ) posts your sighting to Facebook. Of course you need a Facebook account to use this feature, and the first time you use it you will be asked (by Facebook) to give permission for Birdwatcher's Diary to post to your Facebook page. And of course you will also need internet connectivity for this to work. The screen which appears will look like this:
) posts your sighting to Facebook. Of course you need a Facebook account to use this feature, and the first time you use it you will be asked (by Facebook) to give permission for Birdwatcher's Diary to post to your Facebook page. And of course you will also need internet connectivity for this to work. The screen which appears will look like this:
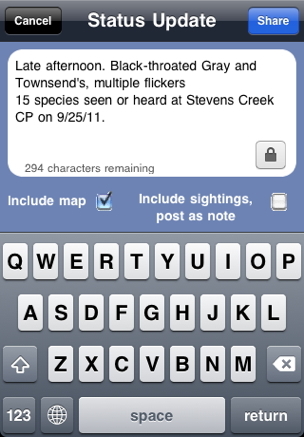
The content of the post will be preset to a summary of the sightings (the number seen, the location, and the date), along with your trip notes from the Archive screen. You can of course modify it as you wish. The "lock" icon allows you to specify the "Facebook privacy" of the post (your friends, just your birding friends, etc.). The Include map checkbox will add a link to a Google map showing each of your sightings, and the Include sightings, post as note checkbox does just what it says - includes a complete list of all your sightings and posts this update as a "Facebook note," because it would be too long for a Facebook status update (unless your list of sightings was awfully short!).
Twitter (accessed with this icon ![]() ) tweets your sightings to Twitter, with the tweet already filled in with relevant information and a link to a map which shows the exact location of each of your sightings. Of course you need a Twitter account to use this feature, and before you can use this feature within Birdwatcher's Diary, you need to use the Twitter section of the Settings app to enter the information about your Twitter account. And of course you will also need internet connectivity for this to work. The screen which appears will look like this, showing you the number of characters left out of the 140-character maximum, and giving you a chance to edit the tweet before sending it:
) tweets your sightings to Twitter, with the tweet already filled in with relevant information and a link to a map which shows the exact location of each of your sightings. Of course you need a Twitter account to use this feature, and before you can use this feature within Birdwatcher's Diary, you need to use the Twitter section of the Settings app to enter the information about your Twitter account. And of course you will also need internet connectivity for this to work. The screen which appears will look like this, showing you the number of characters left out of the 140-character maximum, and giving you a chance to edit the tweet before sending it:
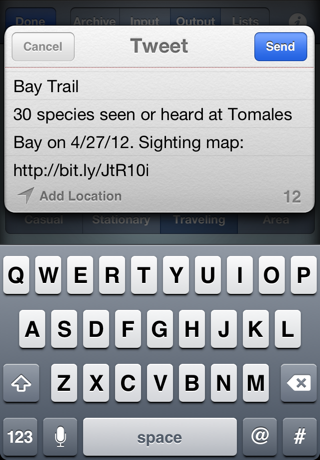
When you post to a listserve, or when you include a complete list of your sightings when posting to Facebook, the items which are included for each species (e.g., Name, Date/Time, Location, etc.) are controlled by the Output Format Table described above.
A note on maps
To create a Google map of your sightings which can be viewed by yourself or anyone else, one way is to output a Google Map file as described above, and to then, as described in the next section, upload that file to Google under your own Google Maps account. Such maps are "permanent," or as permanent as Google allows them to be. However to include maps with listserve or Facebook postings or tweets, we need a way to generate such maps "on the fly," without requiring you to go through those two upload steps. To do that, the software uploads a Google map file to our website (stevenscreek.com), and then generates a URL which points Google to that file to generate its map. To the reader of your listserve or Facebook posting or tweet, the end result is identical. However, because we are a small company, unlike Google, we can't guarantee that we can leave that file on our website indefinitely. Depending on the number of users taking advantage of this feature, we may need to delete them after a few months or perhaps a year. Since no one will likely be reading your listserve email or Facebook post or tweet a week or two from now, much less three months or a year from now, we don't anticipate this being a serious problem. If you want a permanent map that you can refer to forever, just use the method described above (and then below) to generate your own map.
Selecting Input on the Archive/Input/Output/Lists screen puts you into Input mode, allowing you to read bird lists or lists of previous sightings from a website or your desktop computer, as well as photos and the Locations and Phrase Lists files.
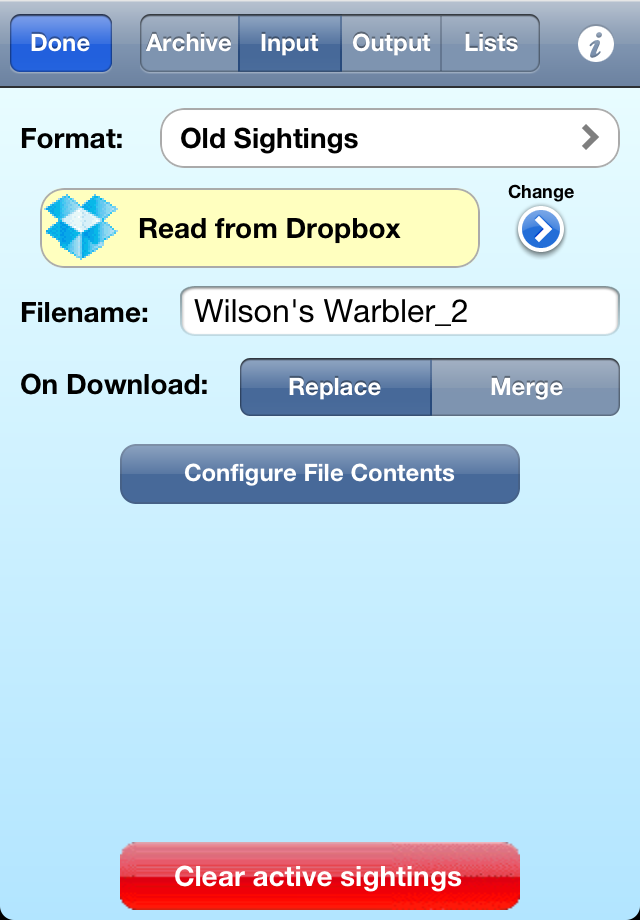
Format: You can input five different kinds of files into the program from this screen— a Master List of birds (which might be a complete list of birds for the state or country you are visiting, or a shorter list of expected birds), a list of Old Sightings recorded by Birdwatcher's Diary (or just output from a spreadsheet or database in which you had been maintaining records of old sightings), a Photo, a Locations File, or a Phrase List File (typically these last two will be files that you are simply transferring from another device).
The settings on the screen determine what you are doing.
Note that this Filename is not the same as the one used for output, and the format table is not the same as the one used for output. Even though in both cases they appear in the same place on the screen, there are separate input and output filenames, and separate input and output format tables.
There are four methods of inputting information. The currently selected one appears on the button which you click to actually perform the input. To change the method, click the right arrow under the word "Change" to see your options:
When you download (input) information into the software, the On Download buttons choose whether it will Replace the information already in the software, or simply Merge to it.
The file (or the information on the clipboad) must always be simple text (i.e., not a Word file or an Excel file but just plain text), with the exception (obviously) of photos, which must be .jpg files. If it has more than one piece of information per line, each item can be separated by either a tab or a comma; the software determines which it is so you don't need to specify it.
When you are reading in Old Sightings, there is the issue of just what information is contained in the file. The possibilities are these: Quantity, Name, Code, Note, Sighting Location, Date/Time, Latitude, Longitude, and Sighting Notes. Which of these pieces of information are found in the file you are reading, and in what order, is controlled by the Input Format Table which appears when you tap the Configure File Contents button. Items on the left under Include are expected to be in the file, and items on the right under Exclude are not. To change the status of an item, just tap on the line. The order of items on the line is changed using the "handles" on the right side of each line. Reading in old sightings is discussed at greater length later in the manual.
Clear all sightings removes all sightings at all locations from the software, after requiring a confirmation. You'll typically do this at the start of each day of birding or at the end of a birding trip. Make sure you have uploaded (output) the recorded data before clearing it, because this operation is not "un-doable."
In addition to the lists on our site, you can easily create your own lists on the desktop and install them. To do this, you create a text file on your desktop (a plain text file, not a Word or other formatted text file) that contains up to five items of information, separated by tabs, one species per line. Those items contain, in order, up to five items:
The "local name" is a place for the name of the species in a language other than English (Spanish, French, etc.) or the name of the species in English but using a name used "locally" rather than one recognized internationally (e.g., in Britain, "Loons" are called "Divers").
Only the first item is mandatory, others are optional. To omit items at the end, simply leave them off. To omit an item in the middle, just use a tab. Thus the following would be valid input files, where -> represents the Tab character:
Example 1: (The simplest format, just a list of species)
Bufflehead
American Avocet
Example 2: (Including the code, the scientific name, and a local name in French. Note that the first line contains only four items, and omits the note or fifth item, while the second line contains all five items)
Bufflehead->BUFF->Bucephala albeola->Petit Garrot
American Avocet->AMAV->Recurvirostra americana->Avocette d'Amérique->Rare/Accidental
Example 3: (The name and scientific name. Because item two, the code, is omitted, a place must be left for it by using two Tabs between the first and third items, effectively providing a blank value for the code)
Bufflehead->->Bucephala albeola
American Avocet->->Recurvirostra americana
If the file contains any accented characters or characters in non-Roman alphabets it must be "UTF-8 encoded" - for more about this see this document.
Now use the Input screen to read the file. Alternatively, if you want to install the file via via iTunes file sharing, you can do so without even using the Input screen. In this case, make sure the file has an extension of .lst instead of .txt. The next time that the software starts, it will notice the file ending in .lst and move it into the Master Lists folder (which you cannot do directly with iTunes), and it will appear on your "list of master lists" to choose from.
Birdwatcher's Diary was designed primarily as a tool to make it easy for you to record new sightings. However, the software has features which allow you to build life lists (full life lists, year lists, state lists, county lists, etc.), so after using the software for a while you may wish to add older sightings. There are two different scenarios — entering individual trip lists, and entering an existing life list.
Reading old sightings which you previously entered into eBird is covered in the separate eBird section below.
If you have a trip list from a specific trip, the simplest thing to do is to enter it just as you would sightings for a new day of birding. If you already have a computerized list, and the list is long, you can also transfer that list into the software; we'll return to that subject later.
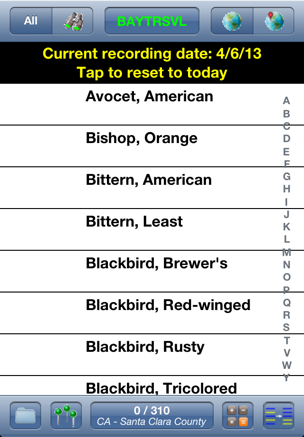
The "recording" date remains active until tap as indicated, or until you exit the application and re-enter the application. To enter sightings for another old trip, just repeats steps 1-7 above.
If you have multiple days of sightings, here are some additional points to consider:
If you want to enter your existing life list into the software, you'll want to think about how to proceed. If there are dozens or hundreds of different locations represented by the sightings, and dozens or hundreds of different days, entering each individual location and date, and then archiving each date separately, may be more work than its worth. To an extent it depends on what you want to do with the list. If you anticipate just wanting to construct new life lists as time goes on, entering all the old sightings on a single date (say, Jan. 1, 2000 or some other arbitrary date) and at a single location (probably our default location "NONE") will serve your purpose. If you anticipate wanting to construct country lists, then the proper approach might be to create a small series of new "locations" which are countries — United States, Trinidad & Tobago, Chile, Botswana, etc., and then enter the sightings for each country at the appropriate location (again, you could do this all on a single arbitrary date, but with multiple locations, just as you can record sightings at multiple locations on a new day of birding). Or, carrying the idea a step further, if you would like to construct state lists with the software, then you might create locations for each state. Remember that no matter which of these methods you choose, you can always record more specific information in the Sighting Notes field of the sighting.
If you do want to record every location and every specific day, of course you can do that, as outlined above in the discussion of entering lists from specific trips. To the extent that your records are accurate enough, this technique will have one advantage, which is that you'll be able to use the Google Maps feature of the software to output a map showing the locations of the life list's sightings. And again, if this information is already computerized in some kind of spreadsheet or database, you may be able to transfer it into Birdwatcher's Diary with a modest amount of effort.
If you have data on your computer in some kind of spreadsheet or database, and you are able to export the data into a simple text file (tab-delimited or comma-separated), you may be able to transfer it into Birdwatcher's Diary without needing to reenter it all by hand. Before we talk about how to do that, if you skipped the section above ("Adding Old Sightings 'By Hand'"), first read that section and think about the decisions discussed there. Do you want to create dozens or hundreds of different locations for the sightings, or just one or more general locations? Do you want to enter a single date for all of the sightings (and hence only need to create a single Archive within the software containing all of them), or do you want to enter individual dates for each sighting, and hence need to create dozens or hundreds of different Archives? Once you've decided, you can proceed.
If you intend to assign a location to each of the old sightings you will be importing, then you first need to create the corresponding locations for those sightings. If your iPhone is running iOS 4.0 or higher and you are running iTunes version 9.2 or higher, then you can create a file of locations (either with a text editor or by exporting from a database or spreadsheet which contains the requred information) on on your computer, and then transfer it into the software (otherwise you'll need to create them directly in Birdwatcher's Diary on the iPhone itself. Here's how to do it:
A file (or multiple files) of sightings can be created on the desktop, and transferred into Birdwatcher's Diary either using iTunes File Sharing (just as was just described for the Locations.txt file), or via other methods described in the main manual (web downloading or the iPhone clipboard). You can create this file with a text editor or by exporting existing data from a database or spreadsheet.
|
Some examples of files for importing sightings, again using -> to represent the "tab" character:
Example 1: In your Input Format table, set Name, Sighting Location, and Date,Time to "Include", put them in that order (vertically), and the rest of the items to "Exclude". Now your input file will look like this to input two sightings each from two different days visiting different locations:
Bewick's Wren->MCCLEL->1/5/11
Nuttall's Woodpecker->MCCLEL->1/5/11
Cooper's Hawk->ARASTR->1/11/11
White-tailed Kite->ARASTR->1/11/11
Example 2: In your Input Format table, set Name and Date,Time to "Include", put them in that order (vertically), and the rest of the items to "Exclude". Now your input file will look like this to input two sightings each from two different days visiting different locations:
Bewick's Wren->1/5/11
Nuttall's Woodpecker->1/5/11
Cooper's Hawk->1/11/11
White-tailed Kite->1/11/11
In both of these examples, make sure to set your Date,Time Format preference in the Settings app to Date Only. After you complete the import process, go to the Archive->Save screen, set the date to 1/5/11, and use the Archive Settings button to save that day's sightings permanently, then set the date to 1/11/11, and Archive Settings again (entering a appropriate information into the Trip Notes field in each case, if you want to.
Many of you will also be users of eBird, the site maintained by the Cornell Lab of Ornithology which allows birders to submit lists of sightings to their online database, and then aggregates those sightings to provide insights into bird behavior. Throughout this manual, there have been references to eBird; in this section, we discuss all the issues which affect the use of Birdwatcher's Diary when you are using it in conjunction with eBird.
Birdwatcher's Diary requires that you select a location to associate with each sighting; eBird does the same. In Birdwatcher's Diary, you have complete freedom as to the name you choose for the location, and furthermore, we also include a choice called "NONE" to record sightings which weren't any place "specific" that you want to establish as a "location." eBird is more constrained. eBird isn't going to be happy if you submit sightings with the location "Home," since everybody's home is someplace different, and we have heard that if you submit sightings at location "None" it places them in "None, Mississippi." Birdwatcher's Diary is happy if you set a location as "Pennsylvania" (appropriate if you are driving across country and recording sightings and won't be back to Pennsylvania). eBird allows this, but discourages it. So if you are collecting data for eBird, you'll want your location names to be specific. You'll also want to check the spelling, because if you spell things differently than the spelling that has already been established on eBird, your sightings won't be aggregated with others properly. For example in eBird there's a location "Monte Bello OSP." If you create a location called "Montebello OSP" or "Monte Bello Open Space Preserve," eBird may not realize it's the same place. So if there is any question, use the "Find it on a Map" option at Step 1 of the manual submission process of eBird to check the existing locations before setting up your own in Birdwatcher's Diary.
There is one other subtle issue with locations. To eBird, each location that you submit is a "checklist" (not to be confused with the more conventional use of the word "checklist" in birding circles, which is a list of birds you might see at a particular park or location, rather than a list of birds that you actually saw). Birdwatcher's Diary organizes data by day, and saves and typically exports data in that way, whether that day involved birding at one location or a dozen. The important thing to understand is that this is completely compatible with eBird. When you export a day's sightings from Birdwatcher's Diary and submit them to eBird, that single export may turn into a dozen "checklists" when imported into eBird. It is possible to export sightings from Birdwatcher's Diary one location at a time, but it is completely unnecessary if you intend to import them into eBird, with one exception we'll discuss below in the "Exporting" section.
One other note on locations: eBird requires that all Country abbreviations be two-letters. So when you are creating new locations, be sure to enter "US" and not "USA" (if the location is in the U.S.!), "CA" and not "CAN" for Canada, etc. For the U.S. and Canada only, they require 2-letter codes for the state or province; for all other countries, they require 3-letter codes. A complete list of "eBird-approved abbreviations" can be downloaded here.
Names of actual species are usually no problem when submitting data to eBird, but subspecies and "spuhs" can be, because eBird has some specific ideas about submitting such sightings, which are discussed here. As an example, eBird doesn't want you to submit "dowitcher sp.", instead, they want "Short-billed/Long-billed Dowitcher." "gull sp." is still ok! If you want to record such sightings in the "eBird approved" form, we have lists of "eBird Spuhs," "eBird Slashes," "eBird Hybrids," and "eBird Forms" which you can download and merge with other lists (your country, state or county list). Unfortunately those lists are fairly long lists, in which most of the names probably won't apply in your situation. So you might want to download those files, trim them down to just the relevant spuhs, slashes, hybrids, and forms, and then combine them and save them as a shorter "eBird special" list that you can in turn merge with other lists. Alternatively, you can just add "by hand" the few that you think are relevant to any other list, making sure that they are in the "eBird approved" format.
Birdwatcher's Diary let's you just "tick" birds, or count them. eBird also let's you submit either actual counts or just "present" (which eBird displays as an "X"), although they strongly encourage their users to do actual counts whenever possible. Whether you do is up to you. The important thing is that Birdwatcher's Diary will adapt to your preferences. If you were "only ticking," when you export the data in order to import them into eBird, you simply select the Report Only as Present option on the Output screen, and all the sightings will be imported into eBird with a count of "X", which means "present" (or "uncounted" if you prefer). If you were counting all the species, you select the Report Counts option on the Output screen and the counts are, as you would expect, imported into eBird. Note that this will be true even if you have the Multiple Sightings mode of Birdwatcher's Diary activated, the mode in which you record multiple counts for one species at a single location when the birds were seen at separate places within that location, separated by the minimum time or distance that you specified (note that in version of Birdwatcher's Diary earlier than 4.1, this wasn't the case).
Finally there is the case where you count most species but not others (often gulls, pigeons, or other species present in huge numbers that you simply don't care to take the time counting). To record a species as "uncounted" in Birdwatcher's Diary, here's what to do:
If you birded at multiple locations, and recorded that species at multiple locations, you need to do this at each location at which the species is uncounted. This is deliberate, because it's perfectly possible that at one location, there might be one gull, which you count, and then at another location there are a thousand which you don't want to count.
On the main screen, a species which has been marked as "uncounted" at all locations at which it has been marked as sighted will display a — (a more typical way to represent "not applicable") in the quantity column. If, however, it has been counted at one or more locations, then a number will be displayed, which is the total number sighted at the locations where the species was counted, plus, somewhat arbitrarily, one each for each location at which you have marked it as uncounted.
When a "non-count" is exported and then imported into eBird, it imports as an "X" as it should. In this case (counting some species but not all), you will again select the Report Counts option on the Output screen.
If you tend to count only "significant" (in your estimation) species, and not to count others, you can set the Default to "Present" setting to On. In this case, your first tick of any species sets its count to "present" (indicated on screen by the —). If you want to actually count the number of birds of this particular species, a second tap sets the count to 1, a third tap to 2, and so on as usual (or you can use the calculator).
In general, exporting data from Birdwatcher's Diary for import into eBird is as simple as going to the Output screen, selecting Seen or Heard as what to Include, eBird as the Format, Traveling for the eBird protocol (collection method), setting the # Observers, and then uploading the data directly to eBird. Of course you can also specify a different eBird protocol if appropriate (read more here). The final parameters, which apply especially to the Traveling protocol, is the Distance traveled (in miles) and the Duration (in minutes). For most purposes, you'll then check (or leave checked) the Calculate button. In this mode, Birdwatcher's Diary estimates your distance traveled by measuring the distance from each sighting you recorded to the next, and the duration by taking the difference between your first sighting and the last, and rounding up to the nearest 15 minutes. It does this for each separate location that you birded. For most purposes, and for the purpose to which eBird is using this information, this should be sufficiently accurate. If you feel that it isn't for whatever reason (you spent the last half of the day walking many miles without a single sighting, for example), you can uncheck the Calculate button and enter your own values. If you birded at multiple locations, and if you feel you need to enter the Distance and Duration manually, this is the one case in which you want to Include not all species Seen or Heard but only species at one Location (at a time). Return to the main screen, select a location, and then on the File->Output screen, with Include set to Location and with Calculate unchecked, enter the Distance and Duration for that location. Export the data. Now repeat this process for each location that you birded, entering the appropriate Distance and Duration for each (or, for one or more of those locations, checking Calculate to let Birdwatcher's Diary estimate the values for you).
There is one subtle issue that affects not how you export the data from Birdwatcher's Diary, but what you see when you examine the data after importing into eBird. Birdwatcher's Diary records the exact time of each sighting and, if you have GPS and Record Lat./Long. set to All Sightings, the specific coordinates of each sighting as well. eBird will not import the exact time of a sighting at all; it only imports the starting time and duration of the outing. And although it does import the specific coordinates, it doesn't appear to use them, and when you review your data on eBird, you won't see them. Because this is actual information, and we don't choose to throw it away, what we do is to put the specific time and coordinates of a sighting into the note field for that specific sighting (adding on to any specific not you already had entered yourself). So you will see this information (as well as whih "sightings" were "Heard Only" when you review the sightings on eBird, although you should be aware that eBird is not actually using this data.
When you submit sightings directly to eBird from the app, at the end you'll end up logged in to the eBird site, looking at a screen that looks like this:
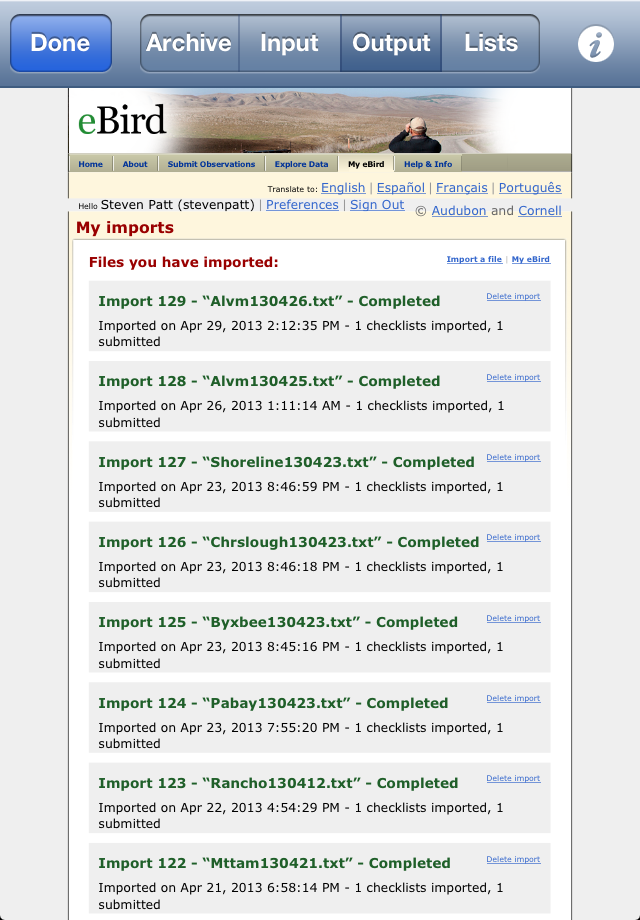
Although it will be fairly small on an iPhone screen (much better on an iPad!), by expanding the screen (using the standard web browser "expand" motion of putting two fingers together on the screen and then separating them), you can actually do anything on this screen that you can when logged in to eBird from a desktop or laptop computer – edit your sightings, browse your previously submitted sightings, explore the full eBird data, etc. In particular, one problem that can occur is if you upload sightings with an "unrecognized species", there will be a message on the screen you see advising you to "Fix species." You can do this right from within Birdwatcher's Diary – just tap on the "Fix species" button and you'll be able to correct the problem immediately. Or perhaps you suddenly realize you forgot to include something, or included something by accident. Just tap the "Delete import" button next to your latest upload, confirm that you want to do that, then fix the problem and upload again. Of course you can also do all this by going to the Safari browser on your iPhone or iPad and logging in to eBird, but this will save you the trouble.
If you do not choose to transfer data directly from the software to eBird, but instead transfer it first (via email, Dropbox, or iTunes files sharing) to a desktop computer, here's how to import it into eBird:
If you entered sightings into eBird before using Birdwatcher's Diary, and want to import those sightings into Birdwatcher's Diary, we've made it particularly easy to do so. You can do so either for individual day's sightings, or for the entire dataset of sightings that you have entered into eBird over the months or years that you've been doing so.
Step one is to export the information from eBird. Here's how to do that:
To export a single day's sightings:
To export all your sightings:
Before reading in the file you downloaded from eBird, there is one thing you may wish to do. The eBird files will contain full location names like "Rancho San Antonio." Birdwatcher's Diary uses location abbreviations to store data. If you don't do anything, when the software reads in the data, it will look to see if you already have a location called (in this example) "Rancho San Antonio" (case-insensitive). If you do, it will use your already-established abbreviation for that location (say, "RSA") to store the data. If you don't, it will establish an abbreviation automatically, simply by taking the first nine letters of the location, after removing spaces, commas, and similar things. So in this case the location would be established as "RANCHOSAN" if you let the software pick the abbreviation automatically. So this is what you need to do — if you want to set up what you may view as more appropriate abbreviations, you should create locations in the software corresponding to the various locations of the sightings you'll be importing. If you don't care, don't worry about it and let the software do it for you. Or you could use a mixed approach, setting up your own preferred abbreviations for some locations, and letting the software do the others.
Once the location issue is setted, in both cases (single day's sighting or a complete set of sightings), go to the File->Input screen of Birdwatcher's Diary, and set On Download to Replace and Contents to Old Sightings. Don't worry about the format table on the bottom half of the screen. The file that you downloaded from eBird has a "header" line (the first line in the file), which the software will use to determine that it an eBird sighting file, and also to determine what kind of file it is (a single day or a complete set of sightings). Once it does so it will automatically know the format of the data and read it in properly.
In the case of a single day's sightings, you can then go to the File->Archive->Save screen, enter a Trip Note if you wish, and tap Archive Sightings to archive the data. When you import your entire set of data from eBird, the process is even easier, because Birdwatcher's Diary will automatically archive each day's sightings, unless you already have sightings archived for that day, in which case the data from the input file is ignored. We do this because many of you have been using eBird and Birdwatcher's Diary for quite a while, before this new import feature was available, and eBird does not allow you to export your data by specifying data ranges; it's all or nothing. So for many of you, the eBird data will include some data which is not currently archived within Birdwatcher's Diary, and some data which is archived. Since we don't want to duplicate data, only the former is automatically archived.
Creating a Life List in Birdwatcher's Diary and Uploading to eBird
Some people like to enter their existing life list (pre-Birdwatcher's Diary) into the software and then upload it to eBird. If you want to do this, you must first read these notes from eBird on what is required to do so. You should read the entire article (it's short), but the two most important points are these: First, you must enter sightings with a date of Jan. 1, 1900, and second, you must enter both a country and a state for the location that you create. This means you cannot simply create a location within Birdwatcher's Diary called "US" or "World" and enter all your sightings at that location. Since eBird will be ignoring (for scientific purposes) the data you submit to them, you could enter them all as a single country and state and county, but if you do that, any attempt to create a country or state or county list (rather than a complete life list), either on eBird or within Birdwatcher's Diary, will give incorrect results, so if such lists are important to you, you may want to enter sightings as much as you can at least by state, if not by more specific location. If you are only concerned with Birdwatcher's Diary, you could enter the exact date of the sighting if you know it, but you need to archive each date separately because of the way the software works. If the exact date doesn't concern you, you can enter all such old sightings on a single date and, if you plan to upload them to eBird, that date needs to be Jan. 1, 1900.
As you can quickly find out for yourself, switching between "All" birds and "Seen or Heard Only" (the Green binoculars) is essentially instantaneous. This means that as soon as you've seen just a few different species, the fastest way to record sightings is to leave the software in "Seen or heard only" mode, because you're probably more likely to need to change the count of an already seen species than to record a new species. When you do see a new species, just tap "All," find it and record it, and then tap the Green binoculars again. In that mode, with 20-50 species on your list, it's almost certain you'll need just a single tap on the letters down the right-hand side of the screen to bring up your bird for recording, with no scrolling at all.
The first obvious tip for a Big Day is to prepare a list of just those birds you have any chance of seeing. Preparing and installing special lists is discussed above. Having done that, not only will it be faster to locate and tick off birds on a shorter list, but also you can take full advantage of the "red-eyed binoculars" or "not yet seen or heard" mode in which the software displays only those species that you haven't seen.
If you are counting birds as well as recording sightings, the "not yet seen or heard" mode will only be useful temporarily, by switching to it to review the species you haven't yet seen. But if you are only "ticking" species, and not counting the numbers of each, then instead of merely switching to "red-eyed binoculars" to review what you haven't yet seen, you can actually record birds in that mode, so your on-screen list will always display only those species you still "need." In earlier versions of the software, ticking a previously-unseen species would cause that species to immediately disappear from the screen (because it is no longer an unseen species) which would make it harder to realize that you had ticked the wrong species, and also harder to make any changes to that sighting (e.g., change it to "heard only"). Beginning with version 3.6, there is a three-second delay, that is, for three seconds after you tick the bird, it remains visible on the screen, marked with a green binoculars. After three seconds, the screen is refreshed and it will disappear. But in those three seconds, you have time to modify the sighting — quickly (within one second) tap the binoculars to mark the species as "heard only," or, after one second but before three seconds, tap the binoculars to edit the sighting, perhaps adding a note (editing sightings is discussed below), or perhaps deleting it if you ticked the wrong species by mistake.
If you output data in the Google Maps format, you will have a file on your desktop which can be used to produce maps in 2-dimensional format (using Google Maps) and even 3-dimensional format (using Google Earth) through which you can "fly" and review your day's sightings. Here's the procedure by which you can use Google Maps:
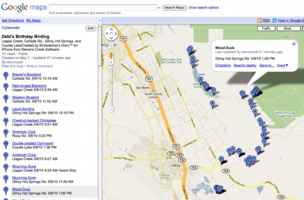
Using Google Earth (which is a separate standalone application from Google, not accessed via your web browser) is even easier. There is only one constraint, which is that the file you upload (the Upload Filename) should end in ".kml" With this file on your desktop, and assuming you have downloaded and installed the Google Earth application, you'll simply double-click on the file to "fly in" to a 3-dimensional map of your sightings.
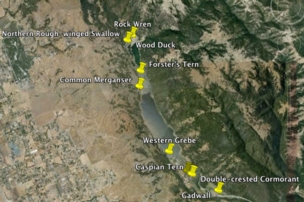
If you keep the iPhone (iPod/Touch, iPad) turned on, or if you simply turn it off but do not exit the Birdwatcher's Diary application, then the location is constantly updated, and will always be available, but this will use up battery power (a fully-charged iPhone 3GS will last about four hours). If you exit the application, and turn on the unit and start the application as you are about to record a sighting, then, depending on your location (for example, under thick tree cover), it may be several seconds or considerably longer before a precise location is available (of course it will also take a second or two for you to find the bird on the list).
If you are doing "high-volume" recording, such as might occur during a Christmas Bird Count, you may want to leave the unit on, so you don't even have to spend the second or so to unlock it. If you are doing "normal" recording (just recording new sightings during a typical day of birding), then turning the unit off but not exiting the application (unless you need to to use another app, obviously) is the best way to use the software. If you are doing a real "big day" involving pre-dawn to post-dusk observation, you might want to invest in one of the several "extended batteries" that are available to ensure your unit will last all day (this is one we have used, as well as this one). Alternatively, if you are driving from site to site (as is so often the case), you might consider one of the various "cigarette lighter chargers" which are available (for example, this one), which will allow you to plug in and recharge the unit as you move to the next site.
An iPhone or iPod is an expensive device, and we don't recommend getting it wet. And the devices can't be operated when wearing gloves at all, with the exception of very thin gloves, which do work, but with diminished responsiveness. However...there are solutions to both of these problems!
Rain: Perhaps surprisingly, iPhones and iPods can be operated inside ZipLoc plastic bags. While any bag you buy in the store will work, the ideal solution is a 3x5 bag which fits the unit perfectly. The bad news is that they're only available in bags of 100 (!), but the good news is they're fairly inexpensive (just a few dollars). Here are two sources we've found; the first is the one we use:
Cold: As noted above, some very thin gloves will work, but most gloves will not, because the iPhone and iPod work on "conductance," that is, they rely on electrical contact with the finger. However, there are now numerous manufacturers of special gloves for iPhones, which either have special metallic fingertips or other mechanisms for assuring proper electrical contact, selling for as little as $7 (and up!).
Styluses: There are also "capacative styluses" (stylii?) that you can use with touchscreens, like this one from Griffin. Because this would require two hands (one to hold the iPhone, the other the stylus) leaving none for your binoculars, it's probably not the best solution for the field, but worth mentioning.
Visit the Stevens Creek Software Home Page
Visit the Stevens Creek Software iPhone Software Support Page
© 2010-2 Stevens Creek Software